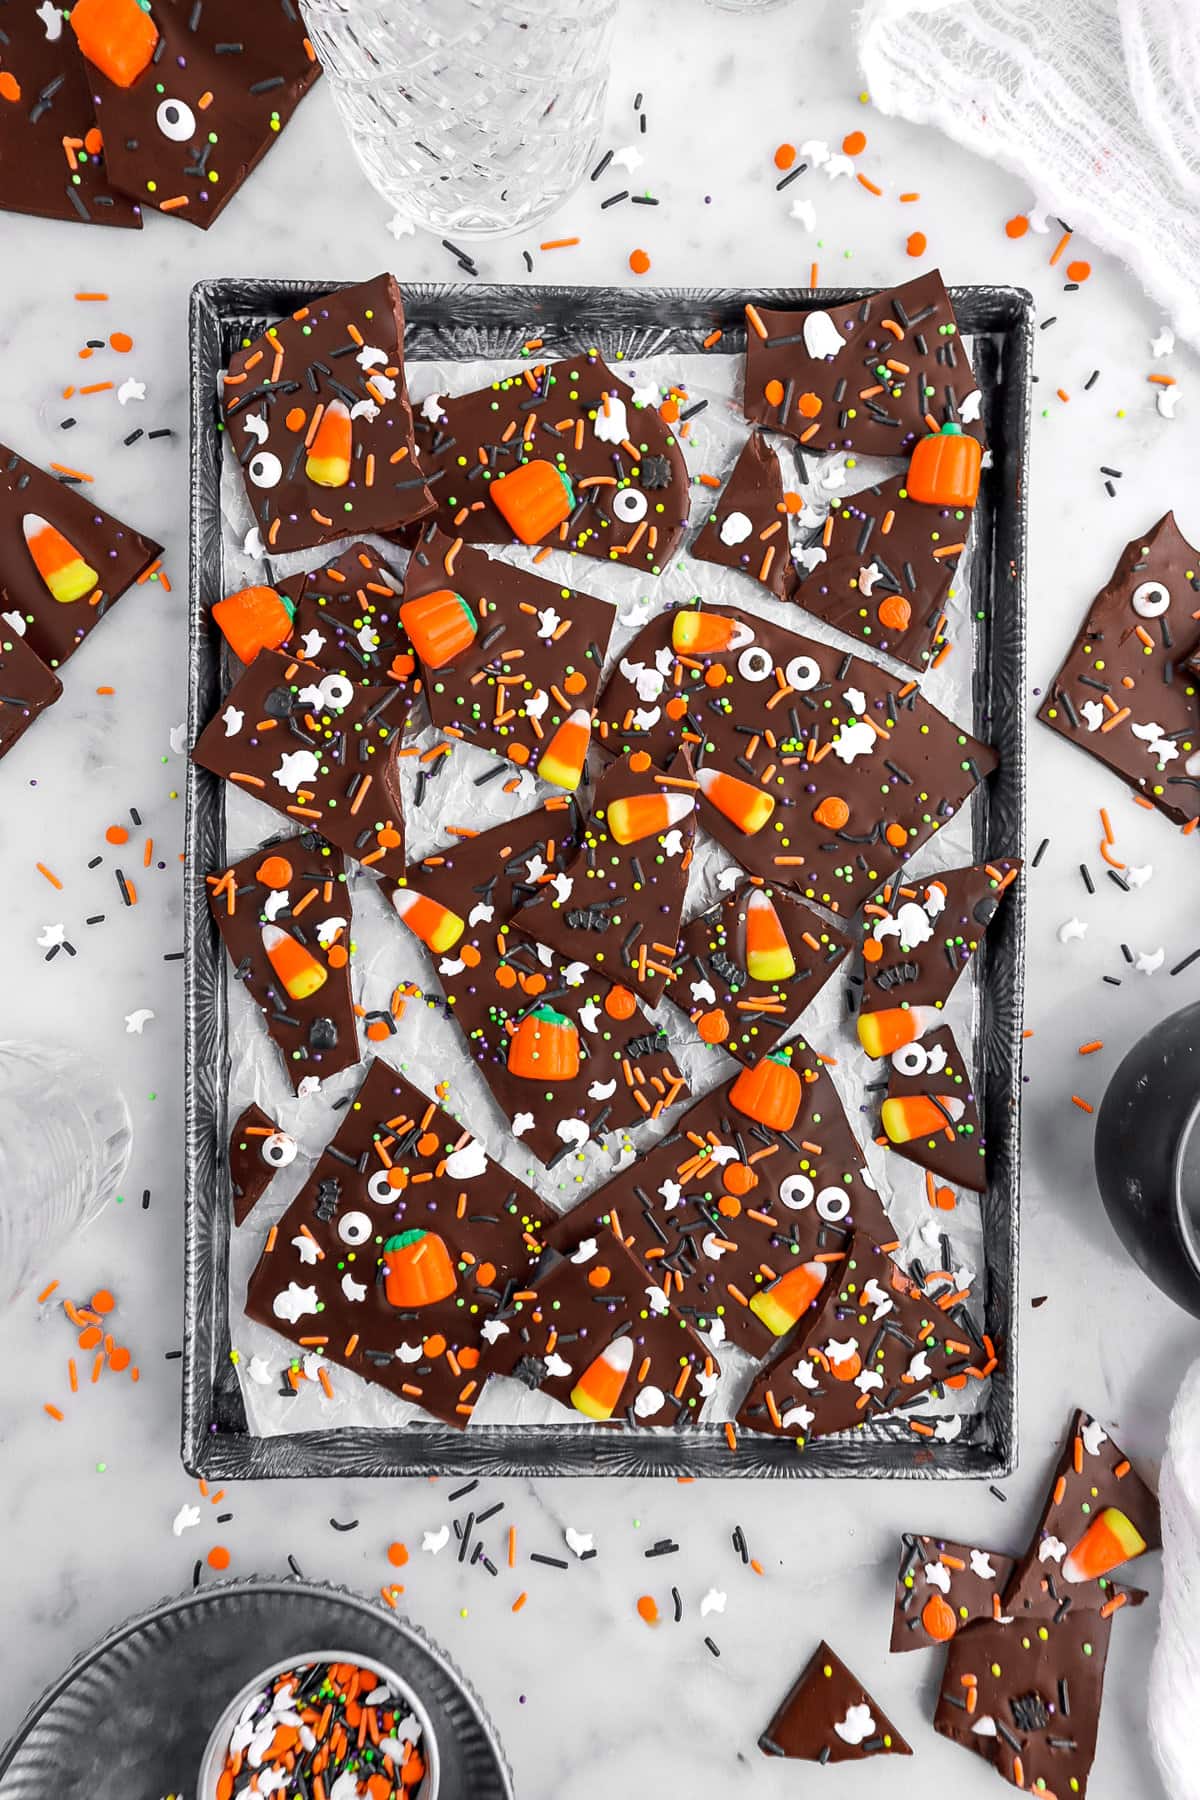
Halloween Chocolate Bark
Prep time: 5 min | Setting time: 5-10 min | Total time: 15 min
Get into the spirit with the spookiest Halloween Chocolate Bark. You don’t need to be a skilled baker to make this frighteningly easy treat! This spooky chocolate bark is entirely no bake, can be made in 10 minutes, and has just 3 super simple ingredients: chocolate, candy corn, and Halloween sprinkles.

Halloween Chocolate Bark
Prep time:
5min
Cook time:
5-10min
Total time:
15min
Get into the spirit with the spookiest Halloween Chocolate Bark. You don’t need to be a skilled baker to make this frighteningly easy treat! This spooky chocolate bark is entirely no bake, can be made in 10 minutes, and has just 3 super simple ingredients: chocolate, candy corn, and Halloween sprinkles.
– know before you bake –
Traci & Caylie’s
Recipe Highlights
This post may contain affiliate links, please visit our privacy policy for details.
Oh, yes. It really is that simple! Every bite is extra sweet, filled with decadent dark chocolate, and just the right amount of crunch from the spookiest of sprinkles. It’s so easy and delicious that it’s almost like magic! The best part? This bark is simply effortless and super fun to make, no matter your age. The perfect Halloween treat!
What’s The Best Way To Melt Chocolate?
For this recipe, to keep things super simple, all you need to do is melt chocolate in the microwave. It takes about 1-2 minutes, depending on the strength of your microwave, and doesn’t bloom when set.
But if you’re worried about the mess it may make when holding a piece of candy bark, you can temper the chocolate. This is a little more difficult, but we have a 3 step guide below to help you through it! You can also purchase a tempering machine, if desired.

Traci & Caylie Crossland
We’re the mother-daughter duo behind Bakers Table, sharing from-scratch recipes made with love, experience, and a serious passion for baking. Traci brings decades of baking expertise, while Caylie brings a fresh perspective and a love for all things creative. Together, we test every recipe to make sure it’s easy to follow and absolutely delicious. Read more about us and our blog →
“Our kitchen is where memories are made — and we’re so glad you’re here baking with us.”
Key Ingredients You Need & Why
- Dark Chocolate – has a higher percentage of cocoa to help cut some of the sweet.
- Candy Corn – not only makes the bark look festive, the soft, chewy, marshmallowy goodness really adds so much deliciousness.
- Halloween Sprinkles – You can use any type of halloween sprinkles you want! I used three different types. Eyes, colored jimmies, and shaped sprinkles. From bats, spiders, ghosts, to skulls! Just have fun and choose what you like best/fits your Halloween vibe.

You can also add things like Peanut Butter Pieces, M&M’s, chopped candy bars…whatever you’d like! To add a savory element, try some chopped pretzels or toasted nuts.
The Best Chocolate To Use For Bark Candy
Since chocolate is the main ingredient here, it’s worth the splurge to use quality chocolate. Chocolate chips/morsels are perfect in recipes like our peanut butter chocolate chip cookies because they hold their shape, but it’s not ideal for melting into bark. Typically, chocolate chips contain stabilizers, preventing them from melting into a silky-smooth consistency.
And even though candy melts are great for coating treats like animal crackers or even cake pops, in a recipe like this, you can really taste the difference between actual chocolate and the chocolate flavored candy melts.
For this recipe, we highly recommend using Ghirardelli, Guittard, or Lindt brand of chocolate baking bars. You can find them in the baking aisle of most grocery stores and they’re usually sold in 4-ounce bars

QUICK TIP: Try mixing it up and doing your layer of dark (bittersweet) chocolate on the bottom and then add a layer of white chocolate on top! For some extra spooky vibes, try swirling them together like we did with our pumpkin cheesecake.
If you decide to leave it layered, it’s still gonna be just as pretty, like our favorite peppermint bark.
Let’s Make Some Spooky Chocolate Bark!
Melt the chocolate in a large, microwave-safe bowl using short bursts of heat, about 15 seconds at a time, stirring well after each round until it’s perfectly smooth and glossy.
Once it’s melted, pour the chocolate onto your prepared pan and spread it into an even layer. Don’t worry about making it perfect; a few swirls and uneven edges won’t matter when we break it.


Now for the fun part—decorating! Scatter your favorite Halloween candies over the top while the chocolate is still warm, pressing them in gently so they stick. Pop the pan into the freezer for 5–10 minutes (if tempering, do not freeze. Allow to harden at room temp), just until the bark firms up and you can break it into pieces.

How To Temper Dark Chocolate
If you would like to temper your chocolate rather than melt it, we’ve got you covered. In three simple steps, you can temper chocolate perfectly every time!
- Place the dark chocolate in a glass bowl and place over a pot of simmering water (this technique is called a baine-marie). Stir until the chocolate melts and temperature is around 124℉/51℃, but no higher 130℉/54℃.
- Remove from heat and cool, stirring constantly, to between 82℉/28℃ and 84℉/29℃.
- Place back over warm water and raise temperature to between 88℉/31℃ and 90℉/32℃. Hold at this temperature.

Try These
delicious
bakes next!


When you make this Spooky Halloween Chocolate Bark, be sure to leave a comment down below! We love hearing from you and answering any questions you might have! Also, be sure to tag us on social media and hashtag it #BakersTable.
Happy baking!
x, Caylie

Spooky Halloween Dark Chocolate Candy Bark
Ingredients
- 20 ounces dark chocolate
- ½ cup candy corn/pumpkins
- 1½ Tablespoons halloween sprinkles
- candy eyes, as desired
Instructions
- Line sheet pan with parchment paper. Set aside.
- Place chocolate in a large microwave safe bowl.
- Microwave in 15 second increments, stirring well after each, until chocolate is melted and smooth.
- Pour onto prepared pan.
- Use a spatula to level.
- While chocolate is still wet, sprinkle with candy corn and/or pumpkins.
- Add sprinkles.
- Place candy eyes as desired.
- Refrigerate or freeze to set.
- Break into pieces.
Notes + Tips!
Once the chocolate is set, you can actually store it as one big piece or after it’s been cut/broken! Either way, the best way to store this chocolate bark is in an airtight container or in a zip-top bag at room temperature for 7-8 days. Substitutions:
- Any Halloween themed candies/treats can be added on top of this bark.
- Semi sweet chocolate can be used in place of the dark chocolate. If using something like milk chocolate, the tempering temperatures will not be accurate.
- Looking for some added flavor/crunch? Try adding nuts! Pumpkin seeds, walnuts, and peanuts all taste delicious with this recipe.
- Be sure to use a good quality chocolate for this recipe.
- When spreading the melted chocolate, use a rubber spatula or an offset spatula to get it perfectly level.
- Be sure to sprinkle the toppings on quickly! If the chocolate is starting to set, the toppings will not stick.
- If you don’t want to refrigerate or freeze this candy bark, you can leave it out at room temperatures to set. Keep in mind setting times will depend on temperature in your kitchen! The colder it is, the faster it will set. The warmer it is, the slower it sets.
- Since the chocolate in this recipe is melted, it may bloom over time. This doesn’t mean anything is wrong with the chocolate, it’s just what happens when the chocolate is not tempered.
Tools You May Need (affiliate links)
– Still Hungry? –
Here are a few recipes may like!


Did you try this recipe?
Let us know in the comments!
Let Me Introduce You!
Hi and welcome! We’re Traci and Caylie, a mother-daughter duo with 30+ years of combined experience in baking, recipe development, and food photography. Our expertly developed and delicious recipes have led us to be featured in publications such-as: Costco, Crate & Barrel, & more!
More about us →
Disclaimer
We use affiliate links on our Equipment Needed and Recommended Products section of each recipe. If you click through these links and make a purchase, we may receive a commission at no additional cost to you. As an Amazon Associate I earn from qualifying purchases.
We use Baby’s Breath for photographic purposes only. Do not consume any parts of the plant.