Mom’s Famous Southern Buttermilk Biscuits
Prep time: 15 min | Cook time: 30 min | Total time: 45 min
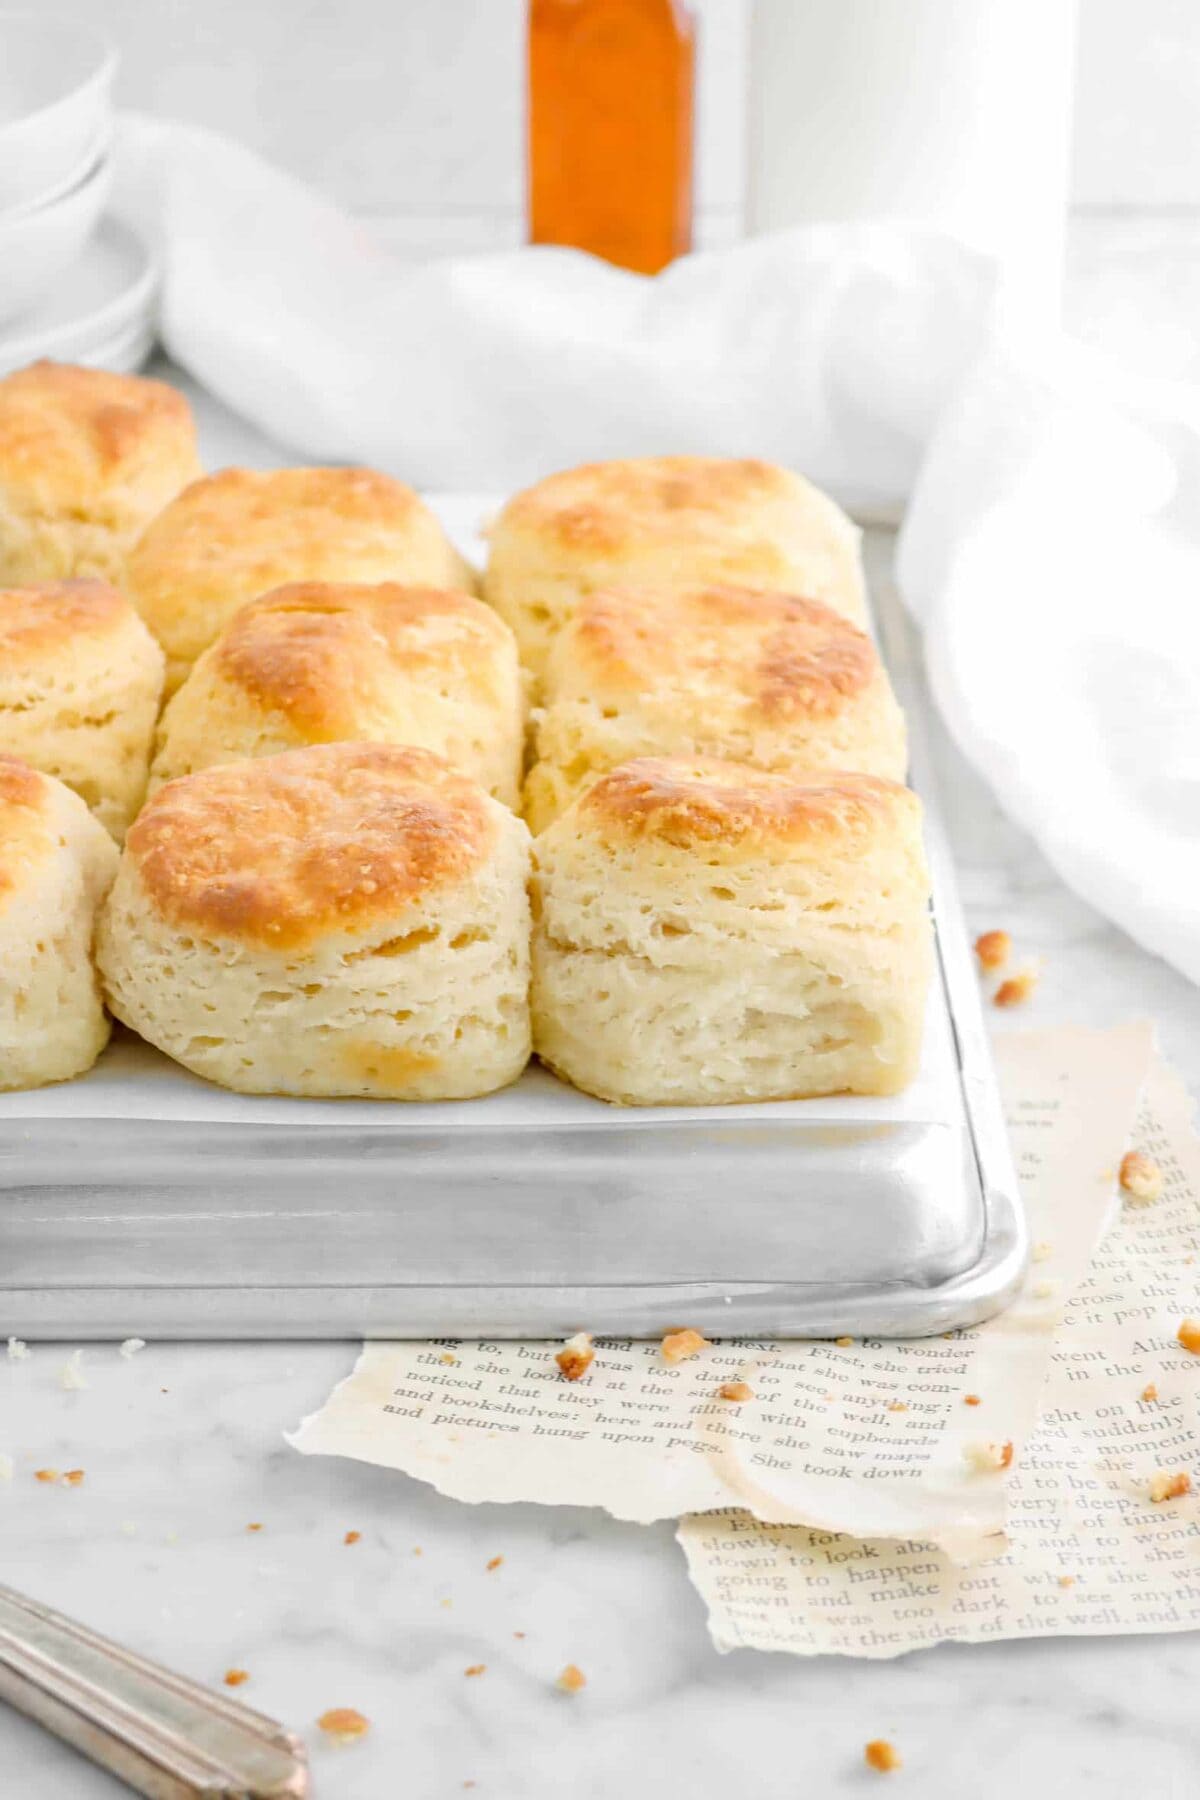
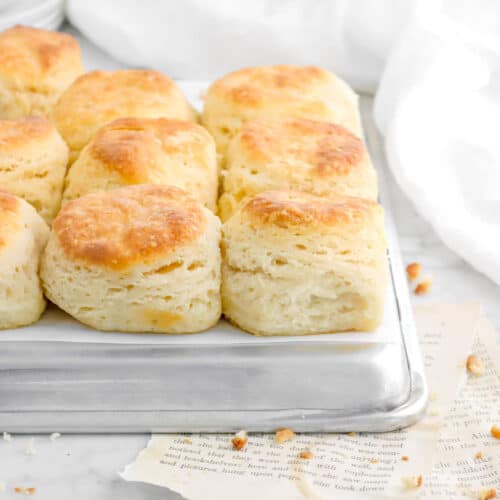
These are the flakiest, most tender, and perfectly buttery buttermilk biscuits — a Southern classic passed down through generations of our family. What makes them extra special? A secret ingredient (sour cream!) and our method of folding the dough for perfect layers every time.
Mom’s Famous Southern Buttermilk Biscuits
Prep time:
15 min
Cook time:
30 min
Total time:
45 min
These are the flakiest, most tender, and perfectly buttery buttermilk biscuits — a Southern classic passed down through generations of our family. What makes them extra special? A secret ingredient (sour cream!) and our method of folding the dough for perfect layers every time.
– know before you bake –
Traci & Caylie’s
Recipe Highlights
This post may contain affiliate links, please visit our privacy policy for details.
These are the flakiest, butteriest, and most irresistibly tender Southern buttermilk biscuits — a recipe passed down through generations of our family and perfected with one secret ingredient: sour cream. With cold butter, a touch of tang, and carefully folded layers, these biscuits bake up tall, golden, with layers and layers.
Whether you’re making breakfast for a crowd, building the ultimate biscuit sandwich, or just craving a little comfort with your coffee, this recipe delivers every single time. No lard, no gimmicks — just a tried-and-true Southern classic you’ll come back to again and again.
One reader, Jessica, says: “I found your recipe this morning. Cut the recipe in half, as it’s just me going to eat them, am amazed & they’re still in the oven. Cannot wait to eat them. Looking into the future, this will forever be my buttermilk biscuit recipe.” ⭐️⭐️⭐️⭐️⭐️
And yes… this is the very first recipe we ever published Bakers Table. It started with my mom, passed down from her great-grandmother, and became a signature at her restaurant in the ’90s. We’ve tested, tweaked, and folded these biscuits more times than we can count — and now we’re sharing them with you.


Traci & Caylie Crossland
We’re the mother-daughter duo behind Bakers Table, sharing from-scratch recipes made with love, experience, and a serious passion for baking. Traci brings decades of baking expertise, while Caylie brings a fresh perspective and a love for all things creative. Together, we test every recipe to make sure it’s easy to follow and absolutely delicious. Read more about us and our blog →
“Our kitchen is where memories are made — and we’re so glad you’re here baking with us.”
What You’ll Need To Make The Flakiest Biscuits
Here’s a quick rundown of the 7 simple ingredients that make these biscuits so special:
- All-Purpose Flour – Provides the structure for those flaky layers.
- Baking Powder + Baking Soda – The perfect combo to help the biscuits rise and stay tender.
- Salt – Just enough to enhance flavor and balance the tang.
- Salted Butter – Cold, grated butter = tender crumb and crispy edges.
- Sour Cream – Our not-so-secret ingredient for added moisture and tang.
- Buttermilk – Classic for a reason — it activates the leaveners and gives that signature flavor.
Pro Tip: Keep your butter, sour cream, and buttermilk ice cold for the flakiest texture.

Our Secret to the Perfect Homemade Biscuit
The real magic behind these buttermilk biscuits? It’s how we handle the butter.
We start by grating frozen butter directly into the flour. This creates small, even shreds of butter that stay cold and intact. As the dough bakes, those little pieces of butter steam and expand, creating distinct flaky layers and that ultra-tender texture everyone loves.
It’s the same method we use for our rough puff pastry and some of our flakiest scones (like these bacon cheddar and chive scones!) — and it never fails.
Think of it as biscuit-making meets laminated dough… just way easier and faster. 😉

By keeping the butter cold and layering the dough with gentle folds, you get light, crisp edges, a soft, pillowy interior, and those irresistible, pull-apart layers every time.
Why We Fold the Dough (and Why It Matters)
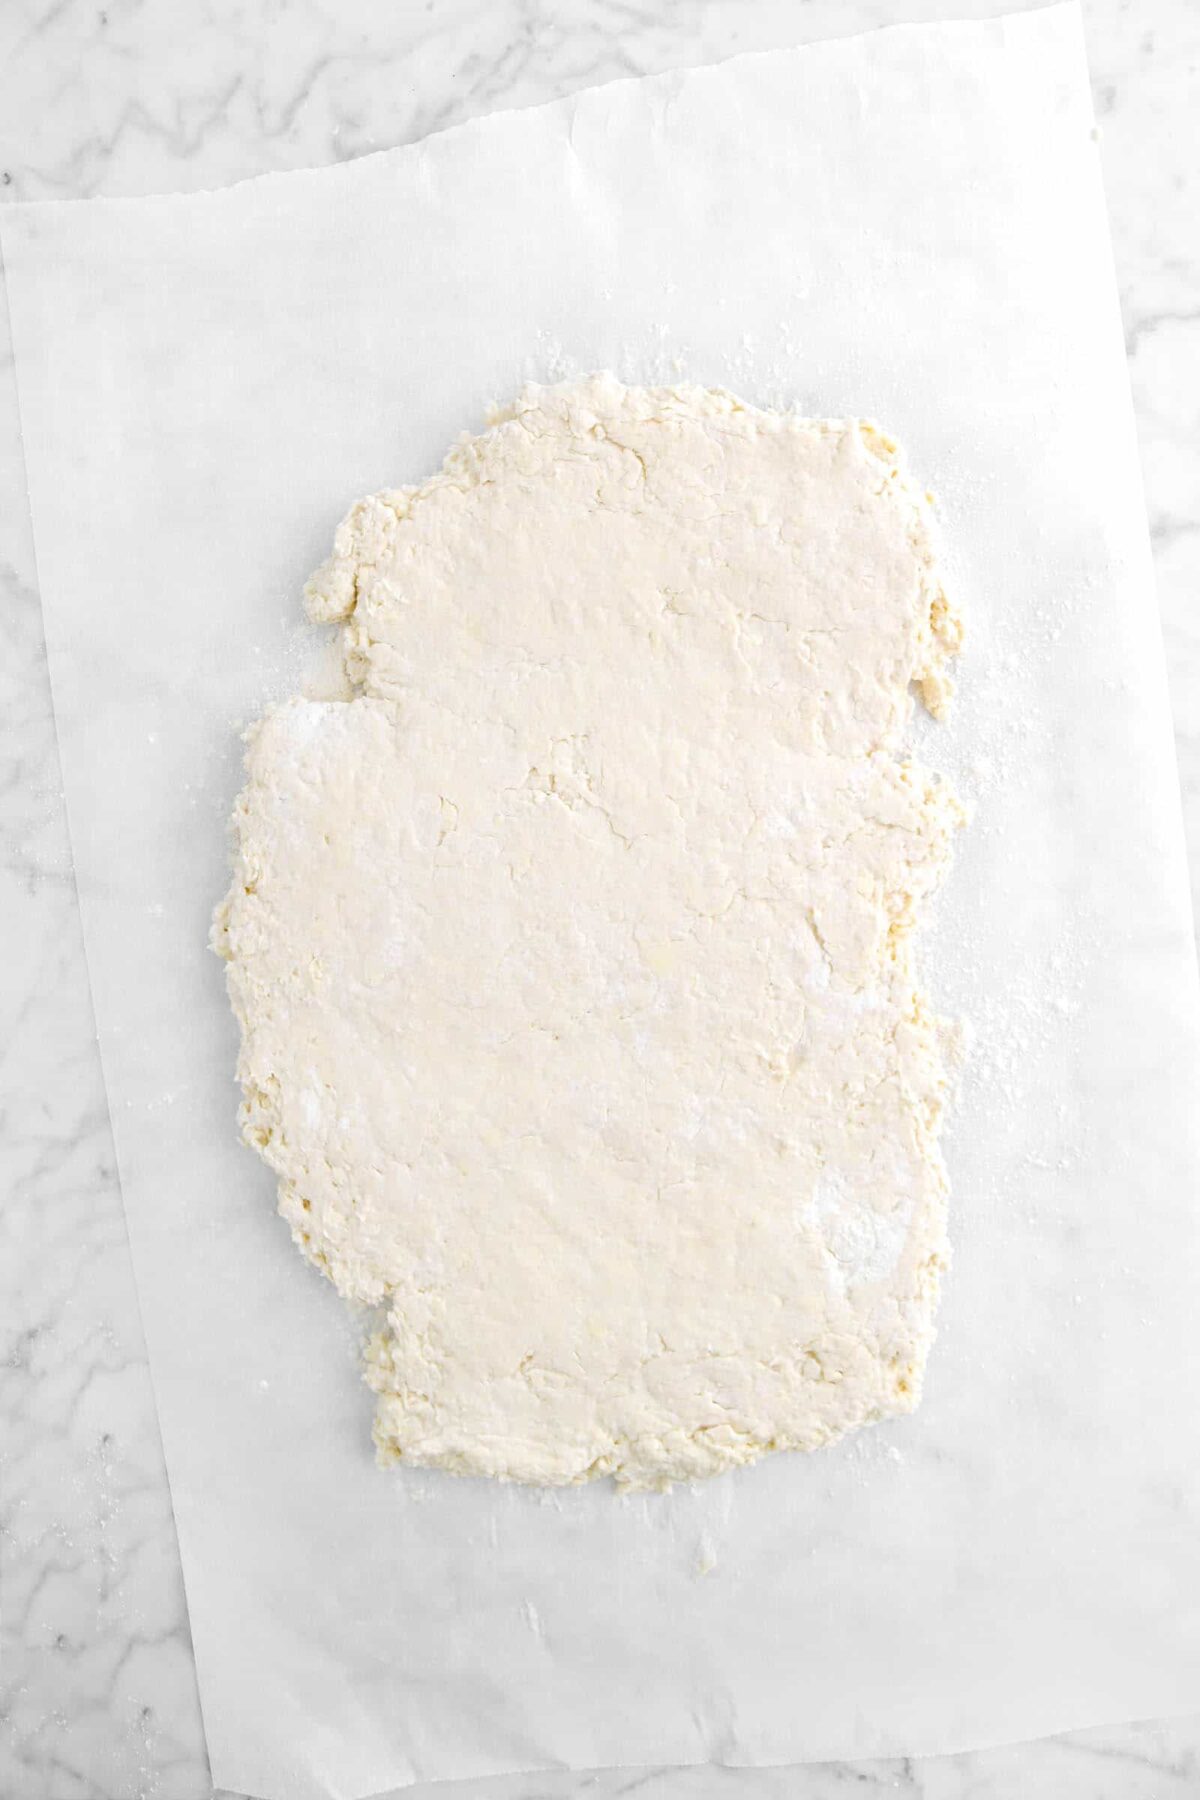
This step might seem extra, but folding the dough is the secret to those tall, flaky layers. Even if you’ve never made biscuits from scratch, this recipe is super forgiving — just follow the photos and method below!
Once the dough comes together, we roll it out and fold it like a letter — top third down, bottom third up — then repeat the process three more times. Each fold creates thin layers of butter and dough, which puff up beautifully in the oven.
Folding also helps:
- Strengthen the dough just enough without overworking it
- Trap air between layers for a lighter texture
- Builds structure for sky-high biscuits
Don’t skip this step! It’s what takes these from basic to bakery-style biscuits — and once you see the layers, you’ll never go back.


⊹ Quick Tip! ⊹
When cutting your biscuits, press straight down—don’t twist the cutter! Twisting seals the edges and prevents them from rising properly. Also, place the biscuits close together on the pan so they support each other as they bake. This encourages a nice, tall rise instead of spreading out flat
Your Biscuit FAQs, Answered!
Can I use unsalted butter?
Yes! Just add an extra ½ teaspoon of salt to the flour mix to balance the flavor.
Can I make the dough ahead of time?
You can shape the biscuits and refrigerate them, tightly covered, for up to 24 hours before baking. Just don’t freeze the raw dough—it affects rise and texture.
Can I substitute Greek yogurt for sour cream?
Yes, full-fat Greek yogurt works well if that’s what you have on hand. It changes the flavor slightly, but the texture stays close.
Do I need a cast iron skillet?
Nope! A parchment-lined baking sheet works just as well. Just make sure your biscuits are touching — it helps them rise taller.
Why did my biscuits turn out flat or tough?
Warm ingredients and over-handling the dough are usually to blame. Make sure your butter and buttermilk are ice-cold, and don’t skip the folding.
Do these freeze well?
Absolutely. Once baked and cooled, freeze them in a sealed bag. To reheat, warm in a 350°F oven for about 10–12 minutes.

Try These
delicious
bakes next!


When you make these Buttermilk Biscuits, leave a comment down below! We love hearing from you and answering any questions you might have! Also, be sure to tag us on social media and hashtag it #BakersTable.
Happy Baking!
x, Caylie
Mom’s Famous Southern Buttermilk Biscuits
Ingredients
- 4 cups all purpose flour
- 4 teaspoons baking powder
- ½ teaspoon baking soda
- 1 teaspoon salt
- 1 cup salted butter, cold
- 1 cup sour cream, cold
- 1 ¾ cups buttermilk, cold
Instructions
- Heat oven to 425℉ (220℃).
- Line a sheet pan with parchment paper. Set aside.
- Whisk together sour cream and buttermilk.
- Refrigerate until needed.
- Sift flour, baking powder, baking soda, and salt into a large mixing bowl.
- Grate butter into flour and toss gently to combine.
- Stir in buttermilk mixture just until mixed. DO NOT OVERWORK!
- Turn out onto floured surface. (It's ok if the dough is a little rough and ready. It will come together as you fold it.)
- Roll into a rectangle that is about ½ inch thick.
- Fold the top third of the dough down.
- Fold the bottom third up over the top.
- Repeat rolling and folding 3 more times (for a total of 4).
- Roll into a 10 inch x 12 inch rectangle that is ¾ inch thick.
- Use a 3½ biscuit (or cookie) cutter to cut out biscuits.
- Gather and re-roll scraps, being careful not to overwork the dough, until all dough is used.
- Place biscuits, sides touching, on prepared sheet pan.
- Bake for 20-25 minutes, or until golden brown.
Notes + Tips!
- Make sure the buttermilk, sour cream, and butter are cold! It gives you the best biscuit, promise!
- Don’t over work the dough! The more you work it, the less tender and flakey it’s going to be.
- Don’t skip folding the dough. This step is crucial for all those delicious layers! If you just dump, roll, cut, and bake, the biscuits will still taste good, but they will be heavy.
- Use a sharp cutter to cut the biscuits. Otherwise, you risk compressing the dough.
- Make sure the biscuits are touching in the pan! This will allow them to rise much better.
- After extensive testing, we determined that nearly equal results can be had by baking in a parchment lined sheet pan or a cast iron pan.
Tools You May Need (affiliate links)
– Still Hungry? –
Here are a few recipes may like!

Did you try this recipe?
Let us know in the comments!
Let Me Introduce You!
Hi and welcome! We’re Traci and Caylie, a mother-daughter duo with 30+ years of combined experience in baking, recipe development, and food photography. Our expertly developed and delicious recipes have led us to be featured in publications such-as: Costco, Crate & Barrel, & more!
More about us →
Disclaimer
We use affiliate links on our Equipment Needed and Recommended Products section of each recipe. If you click through these links and make a purchase, we may receive a commission at no additional cost to you. As an Amazon Associate I earn from qualifying purchases.
We use Baby’s Breath for photographic purposes only. Do not consume any parts of the plant.
I found your recipe this morning. Cut the recipe in half, as it is only I whos is gonna eat. I am amazed & they’re still in the oven. Cannot wait to eat them. Looking into the future, this will forever be my buttermilk biscuit recipe.
Hi Jessica! We’re SO glad to hear that! These are our absolute favorite biscuits. I hope you enjoyed them! Happy holiday’s! Xo, Caylie
I thought some baking soda had to be used in a recipe with buttermilk but I see this recipe only contains baking powder. Your thoughts?
Hi Kathleen! You are absolutely right. As a general rule, acidic ingredients call for baking soda rather than baking powder. The only real difference in the two is that baking powder already has the acid (cream of tartar) added to it. The reason I use baking powder is because when I originally wrote this recipe, I used self-rising flour which was readily available where I lived. However, we moved; and self-rising flour was not available. To make self rising flour, you simply take all purpose flour and add salt and baking powder to it. That’s why is baking powder. You are welcome to substitute baking soda, but remember to cut the amount. Since it doesn’t have the extra additives that baking powder does, you only need 1/4 as much. Let me know if you have any other questions.
Thank you for this lovely recipe. I’ve been looking for something like this to learn how to make bisquit s for years. I can’t wait to try it. Sounds delicious.
Hi Denise! We’re so glad to hear that you’re excited for this recipe! My mom has been baking these biscuits my whole life, and I promise they’re the very best! Let us know if you need anything and how these biscuits turn out for you. Xo, Caylie
Thanks so much for this recipe! My Dad always made the biscuits on Sunday mornings; when he passed unexpectedly no one knew how he did it because he didn’t use a recipe. These look so much like his. I can’t wait to try them!
Hi Rebecca! I’m so glad you found these and that it reminds of your father. We really hope you enjoy these just as much as we do! Let us know if you have any questions about the recipe. Xo, Caylie.
Absolutely adore your site Tracy!! Will never forget the visit we had with you in FL and your rolls!! What was that flour? Still can’t find it in Walmart!! 😩😩 I think you had to order it!!
So glad I found your blog!!!
Nothing like Southern cooks!!! We were ALL trained from the best in the world!!!
Charlotte,
I’ll add links to ingredients that might be hard to find in the Delta.
Thanks Traci. Can’t wait to see more of your blog.
Loved your memories!