Bacon Cheddar and Chive Scones
This post may contain affiliate links, please visit our privacy policy for details.
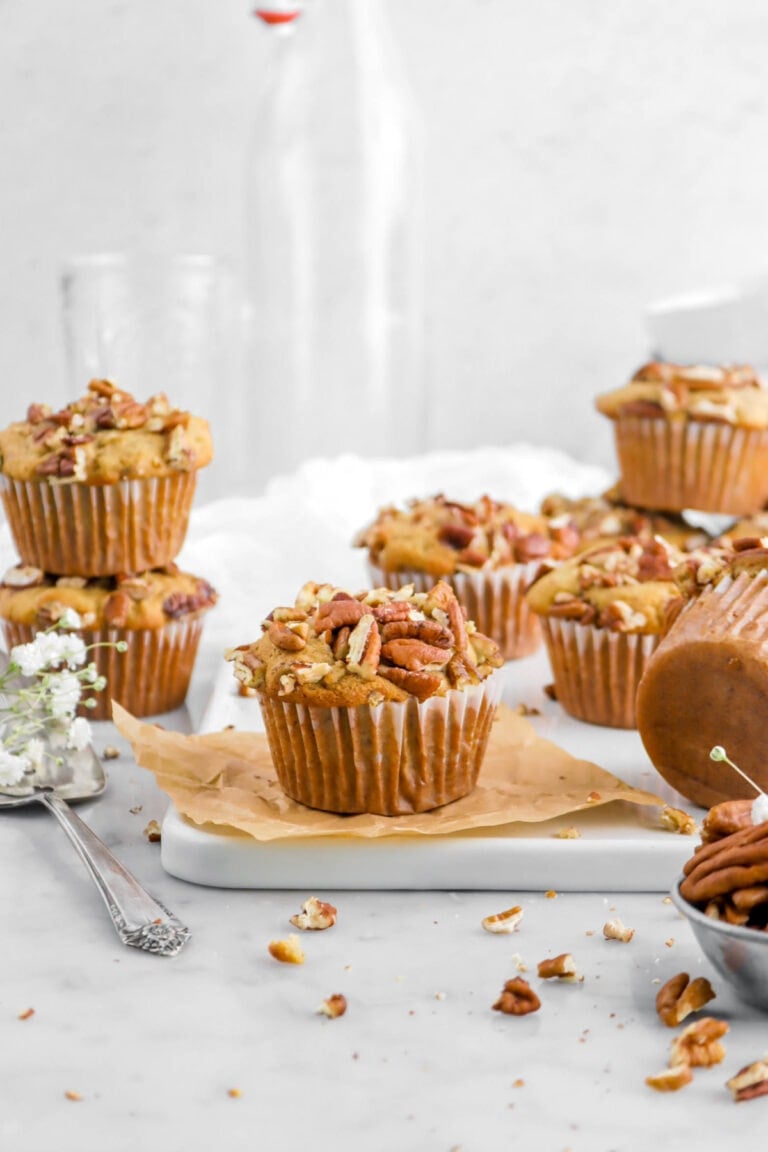
We’re changing it up from the usual sugary breakfast treats with these savory Bacon Cheddar and Chive Scones. Made with buttery biscuit dough, applewood-smoked bacon, fresh chives, and EXTRA cheddar cheese, they have a crispy exterior and a soft, flaky, and cheesy interior. Perfect for breakfast, brunch, or as a snack!
One Reader Commented:

Believe it or not, my mom and I actually enjoy savory food for breakfast, be it a buttermilk biscuit or a slice of ham and cheese casserole. However, most of the breakfast recipes we share tend to be on the sweeter side, such as chocolate sweet rolls, french toast or Dutch babies. But every now and then, we like to do something entirely different.
The best part about these scones? They’re a portable, all-in-one breakfast sandwich! Just grab and go. And to make it even better, we have some secrets and tips to ensure you have perfect scones every time! 😉
Why You Will Love These Savory Bacon Cheddar and Chive Scones
- Perfect for breakfast, brunch, snack-time, or even served as a side dish! They’re the perfect scone to bake all year long, as well as to add to your Thanksgiving Menu.
- Tastes delicious alongside your morning eggs or a big bowl of chili at dinner!
- Each bite is cheesy, flakey, buttery, and SO delicious.
- Unlike traditional scones, this recipe isn’t dry or hard. It’s tender, moist, and full of flavor.
See What Some Our Readers Had To Say:

The Secret To Perfect Scones? Grated Butter!
Just like with pie crust or our buttermilk biscuits, cutting (or in this case, grating!) cold butter into the dry ingredients is essential. When the butter melts as the scones bake, it releases steam, which creates pockets of air! These little pockets of air are what create that tender and flaky center, while keeping the edges perfectly crisp.
And, since you’re going to need a grater for the cheese and the butter, we recommend using a box grater, as it’s easier to hold onto and less likely to slip!
Everything You Need To Make These Scones
We know that butter is essential to perfect scones, but what else do you need? Below you’ll find everything you need and why we use it!
- Bacon – Applewood smoked is our favorite type of bacon for this recipe, but you can use whatever you like! Just be sure that it’s cooked through and thoroughly drained.
- Cheddar Cheese – The tang of sharp cheddar cheese keeps the flavor from getting covered up by the bacon and chives.
- Fresh Chives – The mild onion-like flavor of fresh chives adds a layer of complexity, perfectly complimenting the bacon and cheese.
- All-Purpose Flour – Using plain all purpose flour is the way to go here. The protein content gives the dough the structure it needs!
- Baking Powder – A leavening agent, baking powder is what gives these scones their lift.
- Salt – Just a little bit of salt enhances the flavor.
- Buttermilk – The tang of buttermilk really enhances the flavors, as well as contributing to a light, fluffy texture.
- Eggs – Binding the dough together is only one function of eggs in these scones. They also add moisture and richness, as well as contribute to the structure!

Making Bacon Cheddar Chive Scones: Step-by-Step Photos
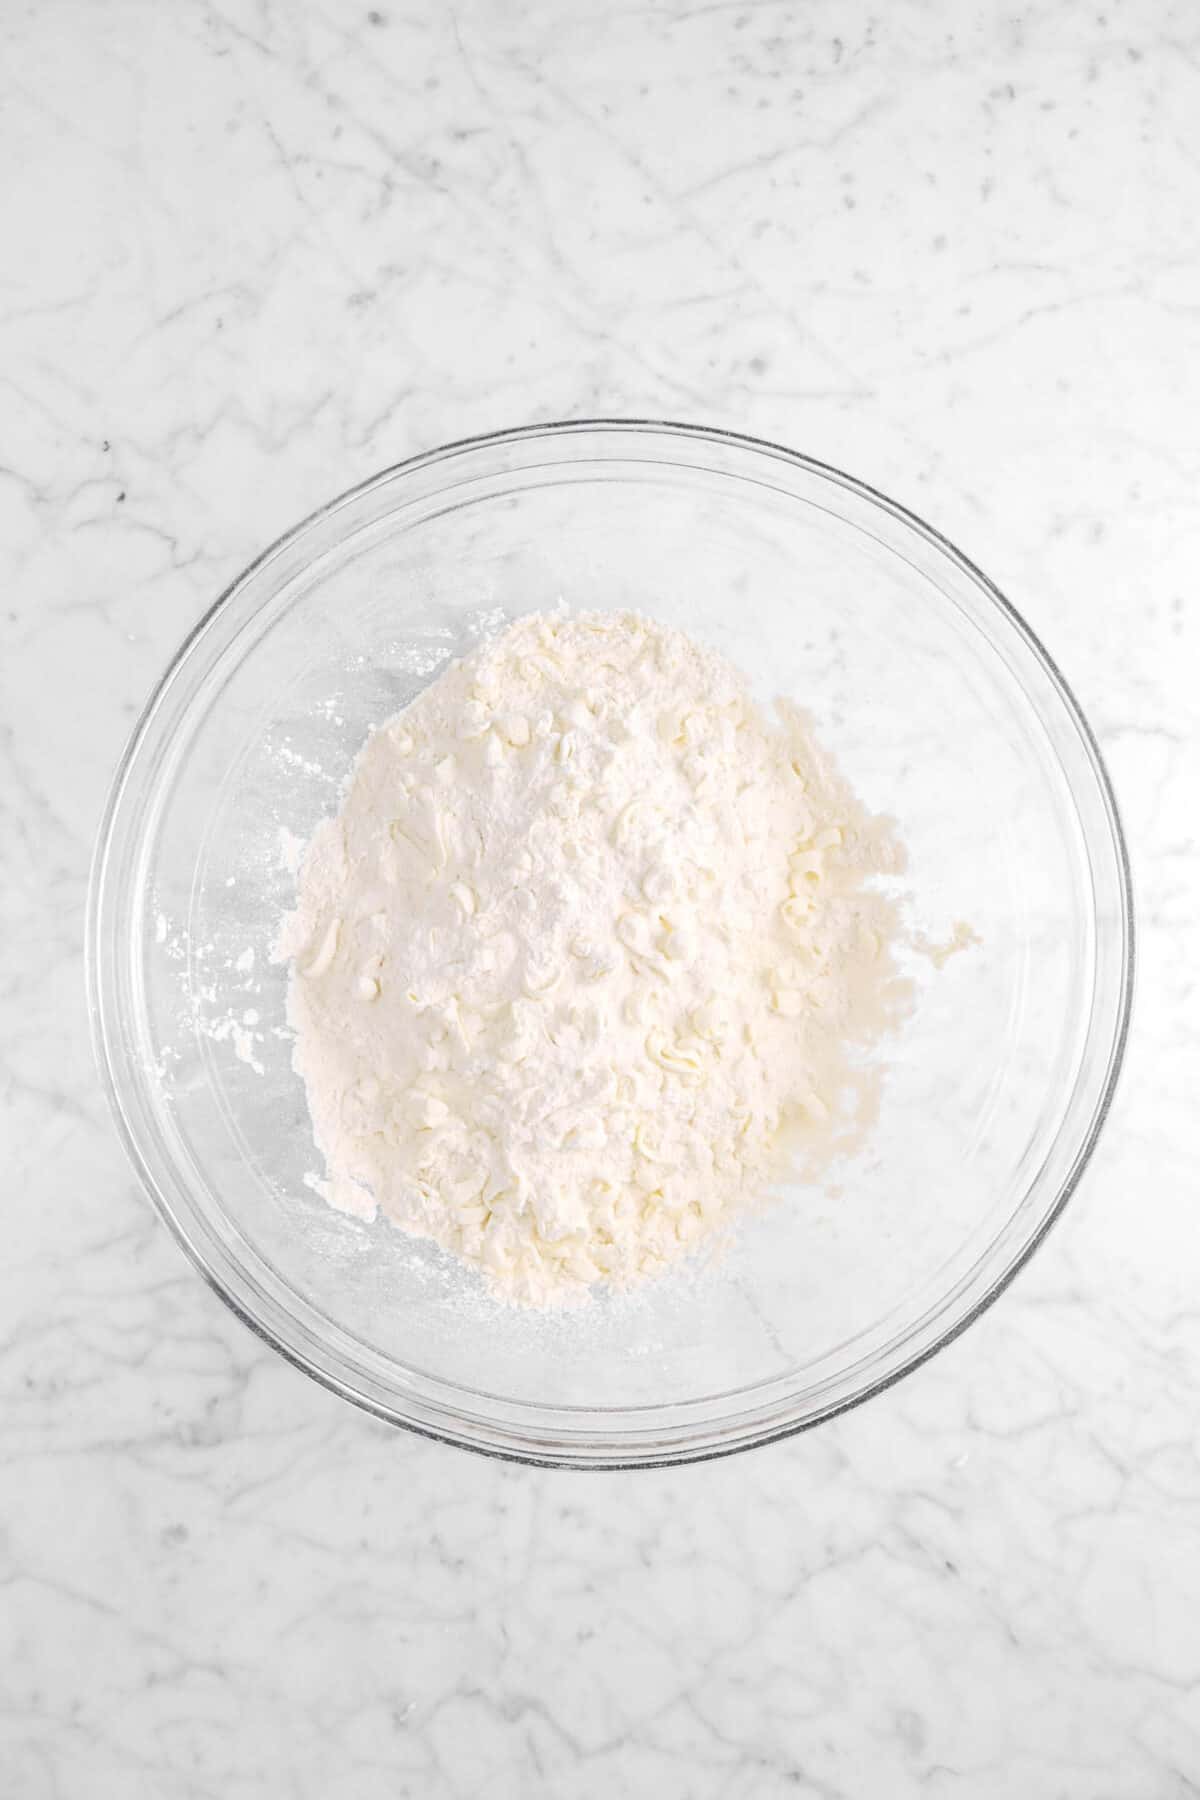
We’re going to start by grating the butter into our sifted dry ingredients. Be sure to gently toss/coat the butter after you’ve finished grating. It’s best to use a spatula for this, as we want to keep the butter as cold as possible!

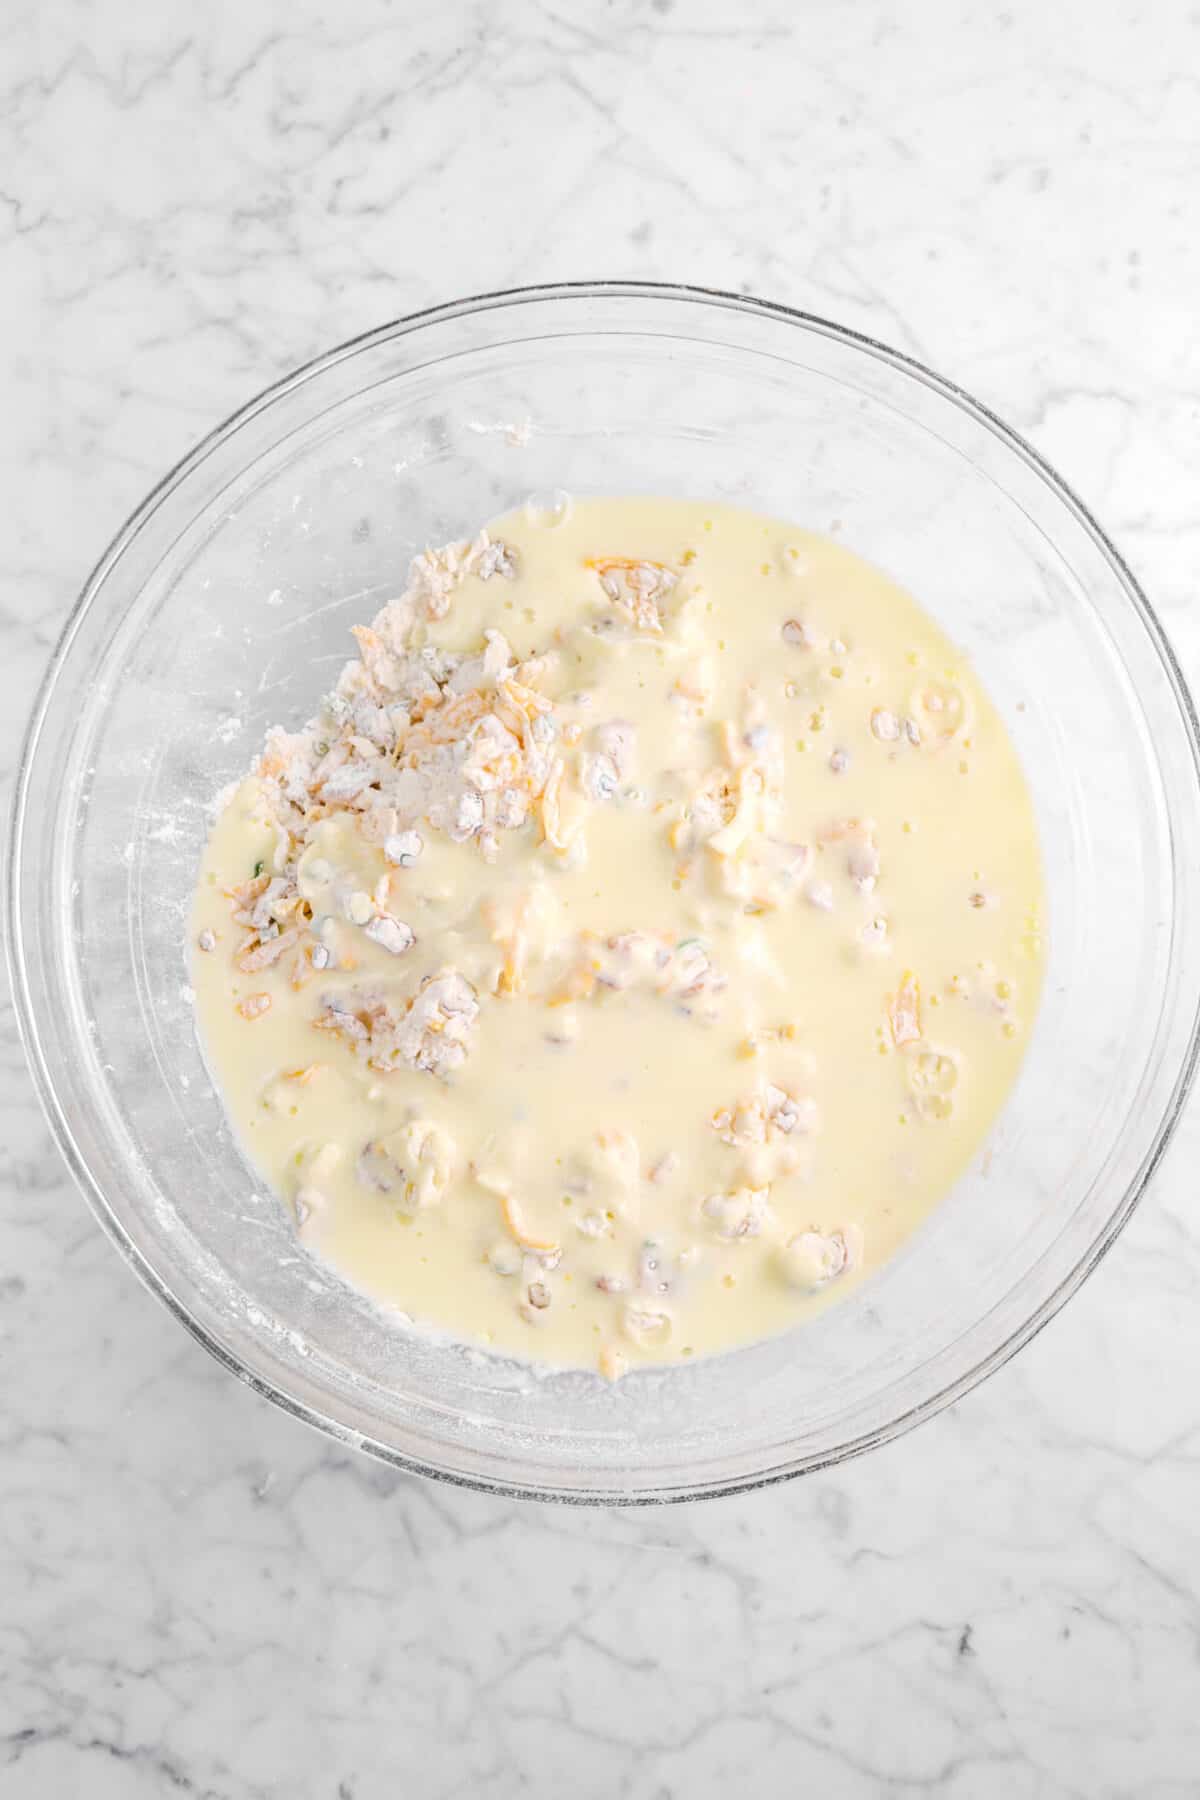
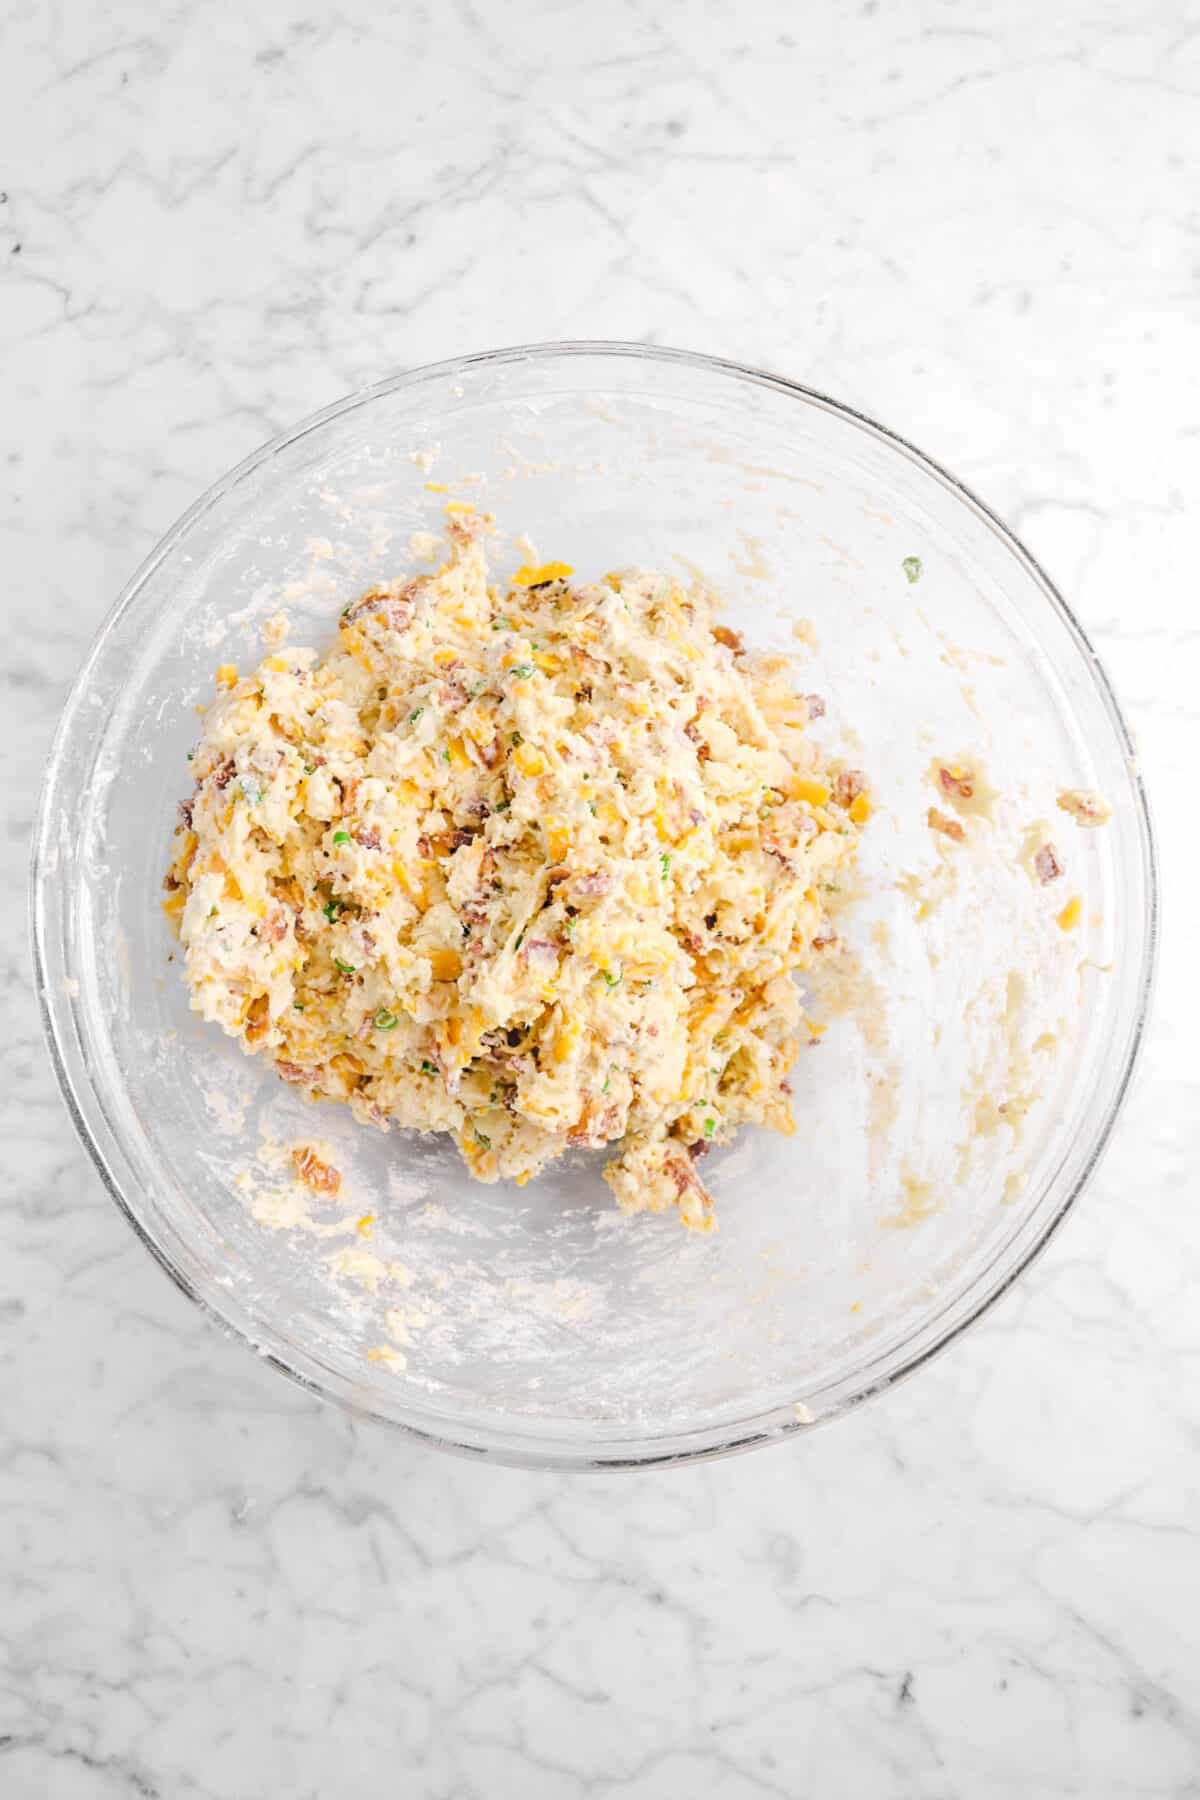
Add bacon, cheddar, and chives. Mix gently until coated. In a separate bowl, whisk together the eggs and buttermilk. Add to the dry ingredients and mix gently until a dough forms. The dough is typically a little sticky. This is okay! Don’t add any extra flour.
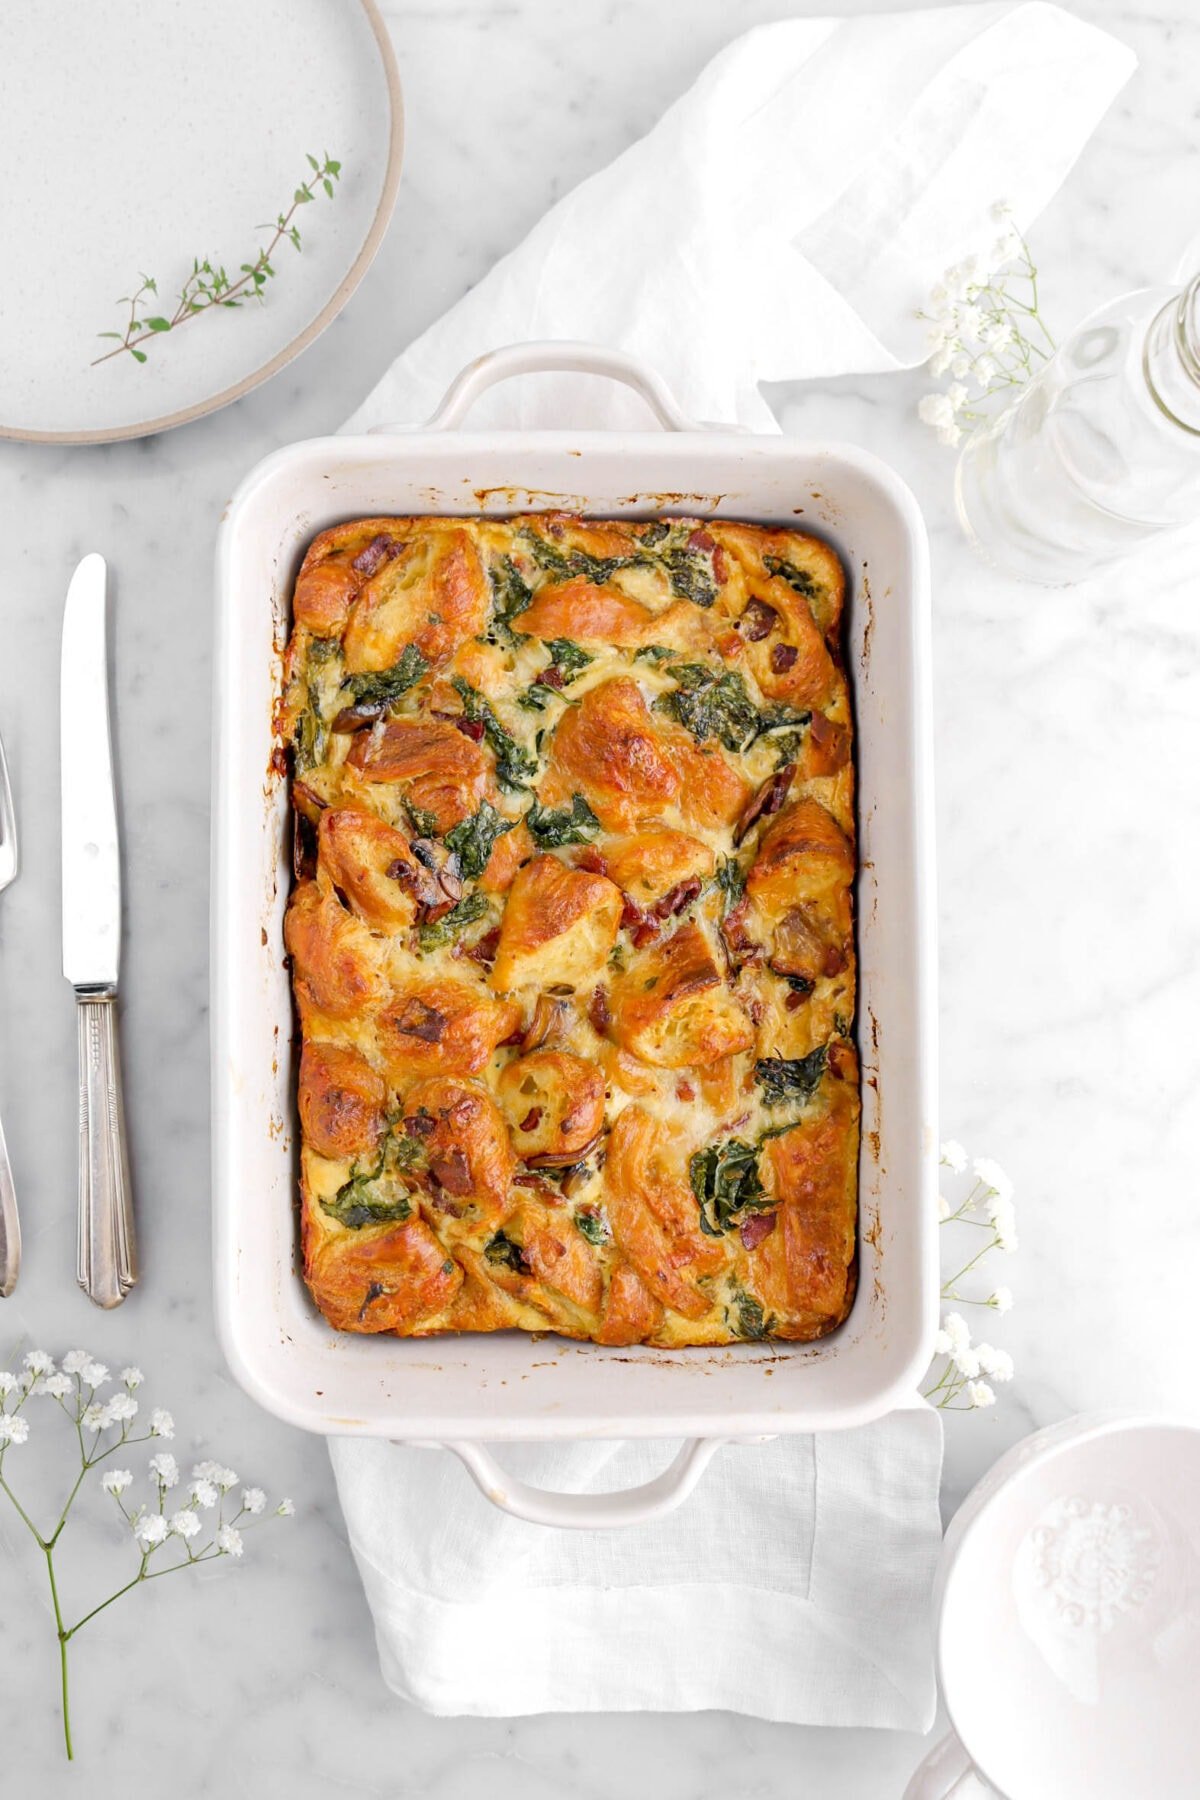
Place half the dough on a lightly floured piece of parchment paper and press out (or roll with a rolling pin) to a circle about ½ inch thick. Cut into 8 wedges (as seen below). Place scones about 2 inches apart on lined sheet pan and bake for 15-18 minutes, or until golden brown.


⊹ A Quick Note! ⊹
Some readers have noted that they’ve experienced the dough being too wet. While we haven’t personally experienced this outcome, there are a few things you can do to prevent it from happening! With the below tips, your scones will come out perfect every time!
Measure your flour THEN sift: It’s 3 cups of flour, sifted. Do not sift the flour before measuring, as this will result in less flour being used in the recipe and making the mixture more batter-like than dough-like.
Drain the bacon thoroughly: You don’t want any excess liquid going into these scones. Be sure that the bacon is thoroughly drained before adding it to the dry ingredients.
Don’t over-measure the buttermilk: Make sure your measuring cups are accurate. If you are using a scale, click the metric button in the recipe card.
Make sure you have the right size eggs: For all of our recipes, we use large eggs. Do not use eggs that are larger or smaller than written in the recipe card. This recipe was formulated specifically to use large eggs (roughly 1.75 oz).

Need more breakfast recipes? Here are a few you might like:


When you make these Bacon Cheddar and Chive Scones, leave a comment down below! We love hearing from you and answering any questions you might have! Also, be sure to tag us on social media and hashtag it #BakersTable.
Happy Baking!
x, Caylie
Bacon Cheddar and Chive Scones
Ingredients
- 1½ pounds bacon, cooked, thoroughly drained, and crumbled
- 8 ounces sharp cheddar cheese, grated
- ⅛ cup chopped fresh chives
- 3 cups all purpose flour
- 4½ teaspoons baking powder
- ¾ teaspoon salt
- ½ cup cold unsalted butter, grated
- 1½ cups buttermilk
- 2 large eggs
Instructions
- Heat oven to 375℉/190℃.
- Line 2 large baking sheets with parchment paper. Set aside.
- In a small bowl, beat buttermilk and eggs together. Set aside.
- Sift flour, baking powder, and salt into a large bowl.
- Grate butter into flour. Stir gently.
- Add bacon, cheddar, and chives. Mix gently and thoroughly.
- Add buttermilk mixture.
- Mix only until ingredients are combined. DO NOT KNEAD! (The dough will be sticky.)
- Divide dough in half.
- Take half of dough and form it into a ball.
- Place on floured surface.
- Gently pat out into a circle.
- Cut into 8 wedges.
- Repeat with other half of dough.
- Place on prepared baking sheet.
- Bake for about 15-18 minutes, until light golden brown.
Notes + Tips!
- Don’t have chives? Use green onion tops instead!
- We used applewood smoked bacon because that’s our favorite. Use whatever you like!
- Sharp cheddar cheese is recommended, but mild can be used.
- Use an oven thermometer to ensure you are cooking at the proper temperature.
- Make sure to sift the flour after measuring.
- Keeping the butter cold and then grating it in is the secret to tender scones!
- Make sure the bacon is thoroughly drained.
- Don’t spray the parchment paper with cooking spray. The scones will spread instead of puffing up!
- You can use a pastry brush to brush off any excess flour.
- These scones freeze beautifully!
- Don’t overwork the dough. Just lightly fold until everything is combined. Don’t knead or squish it!
- You can cut these scones into any shape you like.
- If you make these scones thicker, the bake time will change.
Tools You May Need (affiliate links)
– Still Hungry? –
Here are a few recipes may like!

Perfect recipe. Perfect turn out. I would not change a thing. I have been looking for a recipe like this. Thank you. You Rock!
Haven’t tried making these yet, but I was wondering if I could use whole milk instead of buttermilk?
Hi Megan! I haven’t made them with whole milk, but they should work fine. Just keep in mind that since whole milk is thinner than buttermilk, you may need to use a little less. You can use the pictures in the post to see what the dough should look like. It is a pretty sticky dough, but it should not be soupy. Let me know if you have any other questions.
The dough turned out very wet and sticky like what most people said. I followed the recipe to a T, as well as all the notes and tips. Also needed to be in the oven a lot longer than 18 minutes.
Hi Michelle! I’ve made this recipe countless times, and it always turns out great. However, I live in Central Texas, where the weather can really affect baking, and I also use a BlueStar oven. If your dough feels too wet, try removing one egg first. If it’s still too wet, reduce the buttermilk slightly. Also, be sure to adjust the bake time based on how your oven performs. I hope this helps. Let me know if you have any more questions.
What is your advice if I wanted to make these ahead of time? Keep dough chilled night before or bake and reheat? Freeze cooked and warm morning of? Thank you!!
Hi Alex! Making and chilling overnight will affect the rise. It’s better to bake them in advance and reheat. Personally, we bake them in large batches and freeze them, then reheat whenever anybody wants one. It will be better to reheat in the oven. The microwave makes them tough. Let me know if you have any other questions.
This recipe is very wet. Unlike any scone I’ve baked in the past. I’m skeptical on a good result. I had to put a ton of flour on the board to even get a disk. Hopefully they turn out because I used high quality ingredients.
Hi Cecilia! Thank you for bringing this to my attention. I think I figured out the problem. I write the recipes on this site for American home cooks. Unlike professionals (and most Europeans), most American home cooks don’t have a scale. When I write, I use volume measurements measured the way most Americans measure. Thanks to you, I understand that I need to include a way to make the measurements more accurate by weight. I have added the note to this recipe, and am in the process of adding it to the rest of the recipes on this site. I hope you give the scones another try using the adjustments.
Dumb question….do you cook the bacon before you add it?
Hi Petunia! You need to cook the bacon, drain it, and chop it before adding it to the dough. Let me know if you have any more questions.
I’ve made these scones twice now and the dough ends up being very sticky. I add flour to my counter but I don’t want to knead it. Next time I’m going to add four cups of flour. Nevertheless, they always turn out amazing!!! Note: I live in West Texas and our climate is dry. Could be the reason I need more flour.
Hi Susie! I would recommend reducing the amount of buttermilk instead of increasing the flour. Let me know if you have any more problems.
Hi there,
For clarification, are you separating out the scones on the baking sheet after cutting them into 8 or are you baking them together like a disc? Does that make sense?
Hi Laura! Yes, you need to separate the scones before baking them. If you bake them together, you will have one giant scone rather than 8! If you have any more questions, please don’t hesitate to ask. We hope you love these scones! 🫶 x, Caylie
Could you mix these up the night before and bake them in the morning?
Hi Amanda! You can absolutely do that. Just cover and refrigerate them immediately. Keep in mind, they won’t rise quite as well. Let me know if you have any other questions.
I made these this morning and they are so good! I will say that I probably baked them for about 40 minutes for them to be done.
Hi Kelsey! Thank you for making our scones 🥰 We’re so happy to hear you loved them!! x, Caylie
Hi, I was really excited to make these. Yours look so good. Mine didn’t rise as much as yours, and I didn’t overwork or knead the dough. They did rise some, but yours look much lighter and fluffier than mine. Also, at 375 degrees, they were no where close to being done in 18 minutes. Honestly, I’m not sure I ever got them right. Would the fact that I had to keep checking them and putting them back in have effected the rising? And, are scones supposed to taste kind of doughy?
I also have a question about how You in particular go about mixing everything up without overworking the dough when it starts to get really sticky and heavy, and it will stick to the spoon. A video with the recipe would have been great.
One other question. What’s the fastest way to wash and chop chives? I’ve never done it before, and it took me a ridiculous amount of time which is why I am not saying how much time. So, please feel free to share your knowledge!
Thank you!
Hi Sherry! I’m so sorry you had so much trouble. I’ll be happy to try to help. First, make sure you check the date on your baking powder. If it’s been opened, the shelf life is about 6 months. You can test it by stirring some baking powder into hot water, about 1 teaspoon baking powder to 1/2 cup water will do. If it fizzes a lot, it’s good. A lot of things can affect the timing of your bakes – the type of oven you are using (gas or electric), how accurately the oven cooks, the type of pan you use, even the weather. Another thing to keep in mind is that every time you open the oven door to check on your scones, you let heat out. If you kept taking them out and putting them back in, you dramatically lowered the temperature; and they didn’t cook. That’s why they were doughy.
Was your butter really cold? If it wasn’t, that could contribute to the stickiness. Also, different flours have different absorption rates. The amount of humidity in the air can also affect absorption rate. I use King Arthur flours because they are always consistent; and in my opinion, are the best on the market. Try using a silicone spatula to mix the ingredients. If your dough is still a little sticky, add a little extra flour to the surface you are rolling on; then scrape the dough out, half at a time, and add a little extra flour on top before you pat them out. We are in the process of adding videos to the recipe cards, but it is a time consuming process. Please be patient with us on that.😊
For the chives, just rinse them under running water like you would any other herb. To chop, stack them together and use a sharp knife to cut horizontally into pieces. You can also substitute green onion tops for the chives. Just don’t use the white part of the onion.
Please let me know if I can help with anything else.
Thank you for taking so much to answer my questions. I really appreciate it!
What you said made sense. We have a cheap electric stove, so that may have been a factor. As was the opening of the oven door. I’m wondering if the circles that were doughy-just tasted them- if it would help to bake them some more, or is that a ridiculous idea? I will give the flour you recommended a try.. I can’t remember if it was humid yesterday or not. I had the butter really cold-frozen and grated.. Well, life is all about learning. Thanks again for your help, and I look forward to when y’all add videos. I’m sure that is a lot of work. Your photos are great.
I’m always happy to try to help! You can buy an inexpensive oven thermometer at Walmart or Target. That will help a lot. As far as baking them some more, there are some things you can do that with; but bread doughs usually aren’t among them. You might be able to cut them open and toast them as you get ready to eat them.
The flavour of these is good, however the ratio of wet to dry is way off. Mine was like soup. I needed almost double to dry to make a workable dough.
Hi Sarah! I’m sorry your dough didn’t work. I just went back and re-made the scones trying to see what might have happened. My dough came out exactly as shown in the recipe. I would love to help you troubleshoot it! Can you tell me exactly what you did? Just for reference, it is not meant to be a stiff dough. It should be a little tacky. You also only need to lightly stir it together, just until the dry ingredients are moistened. It should never be worked or kneaded.
I made these today and all that I can say is “Incredible “! I made them in a cast iron skillet , scored and sprinkled with Parmesan. Cooked for 35 minutes. Excellent I will definitely make these again!
Hi Debbie! We’re SO glad you enjoyed these scones. Thank you!!😊