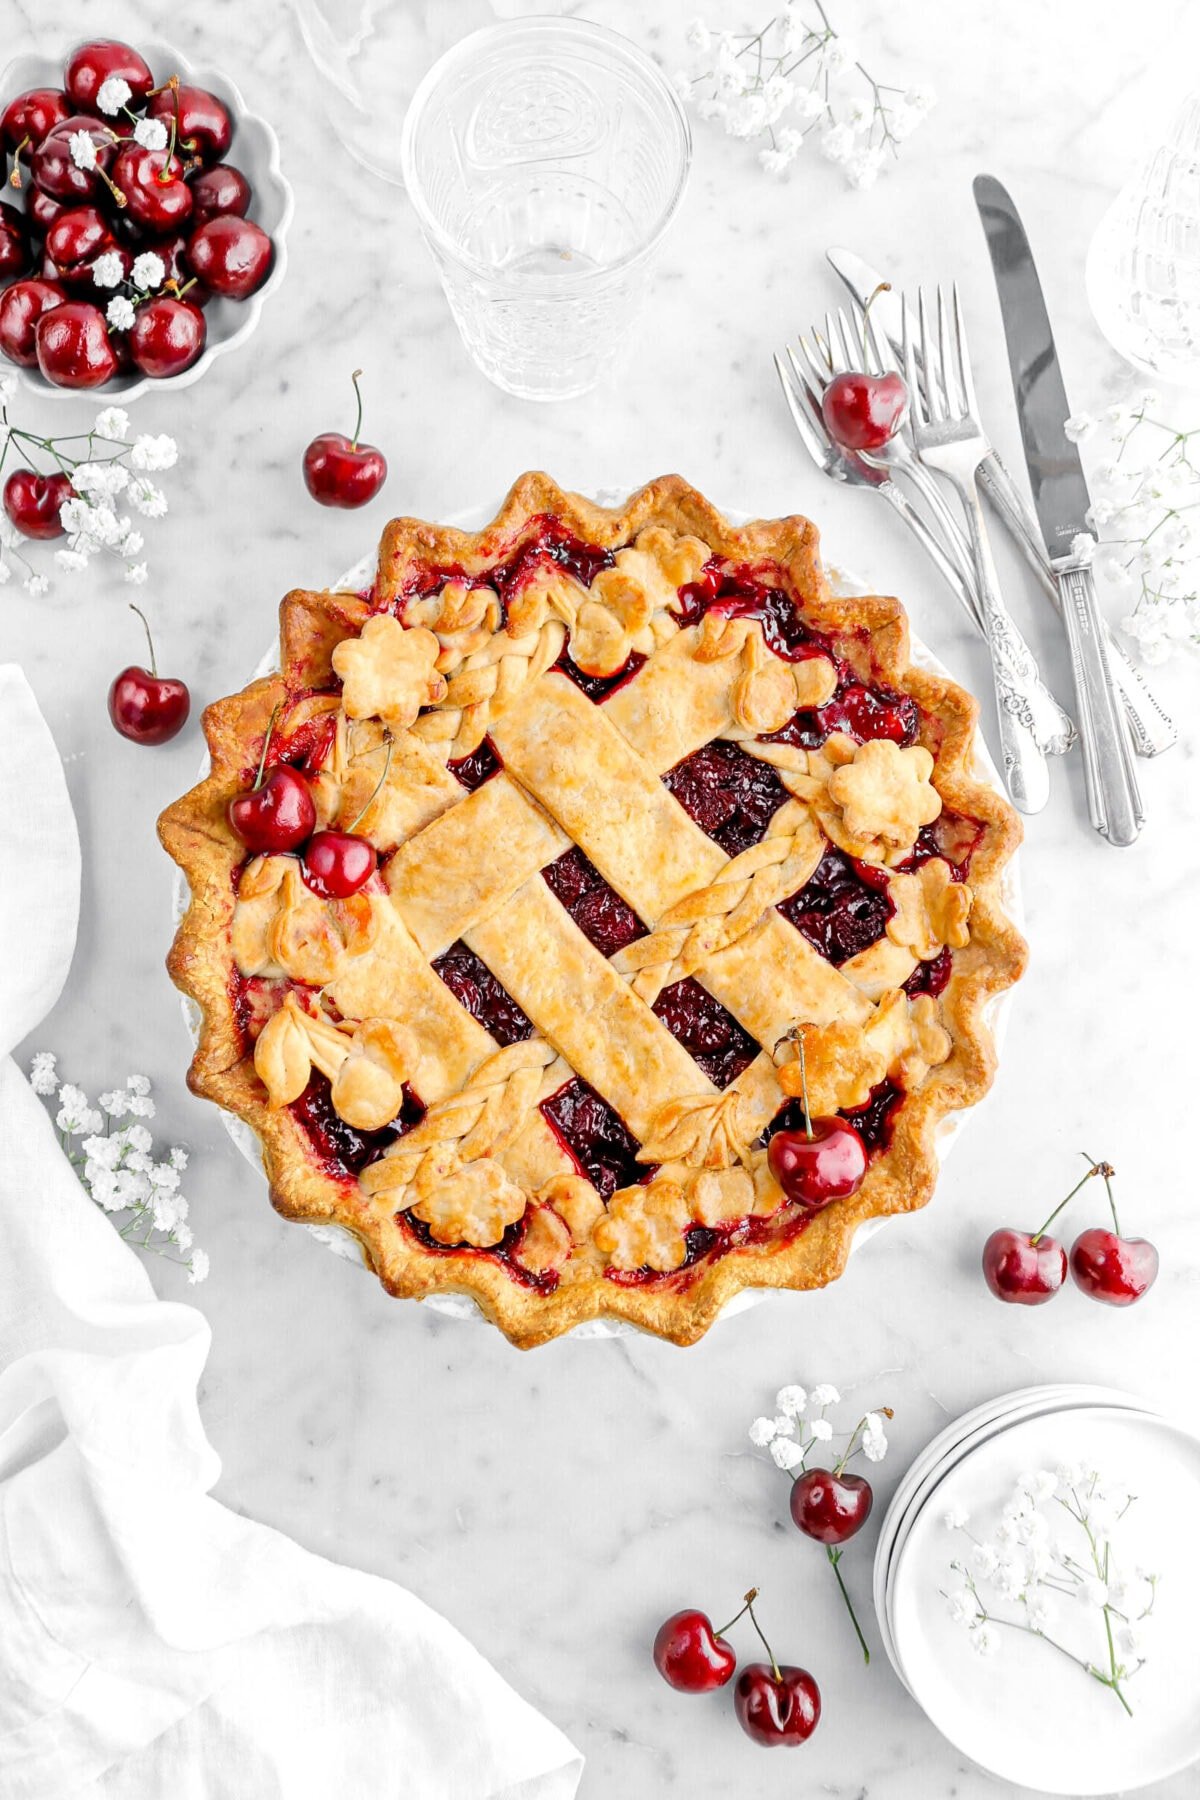
The Best Homemade Cherry Pie (Thicker Filling!)
This post may contain affiliate links, please visit our privacy policy for details.
This homemade cherry pie is bursting with fresh, sweet cherries and is the perfect balance between juicy and thick. It’s flavored with hints of vanilla and almond extract and encased in a buttery, flaky crust.
This recipe is perfect for anyone who wants a delicious and easy-to-make cherry pie. It’s great for summertime baking, but can also be enjoyed as a Thanksgiving dessert or a Christmas treat.
Here’s what makes this recipe special:
- Perfectly balanced filling: Not too juicy, not too thick, it’s just right!
- Fresh, sweet cherries: We use sweet red cherries for the best flavor, but you can also use tart cherries if you prefer.
- Homemade crust: Making your own crust is easy and so much better than store-bought!
- Easy to follow instructions: This recipe includes detailed instructions and helpful tips for making the perfect pie.

Ingredients
Full ingredient amounts and instructions can be found in the recipe card at the bottom of the post.
For the pie crust:

For The Filling:

For the egg wash:

Ready to bake? Let’s get started!
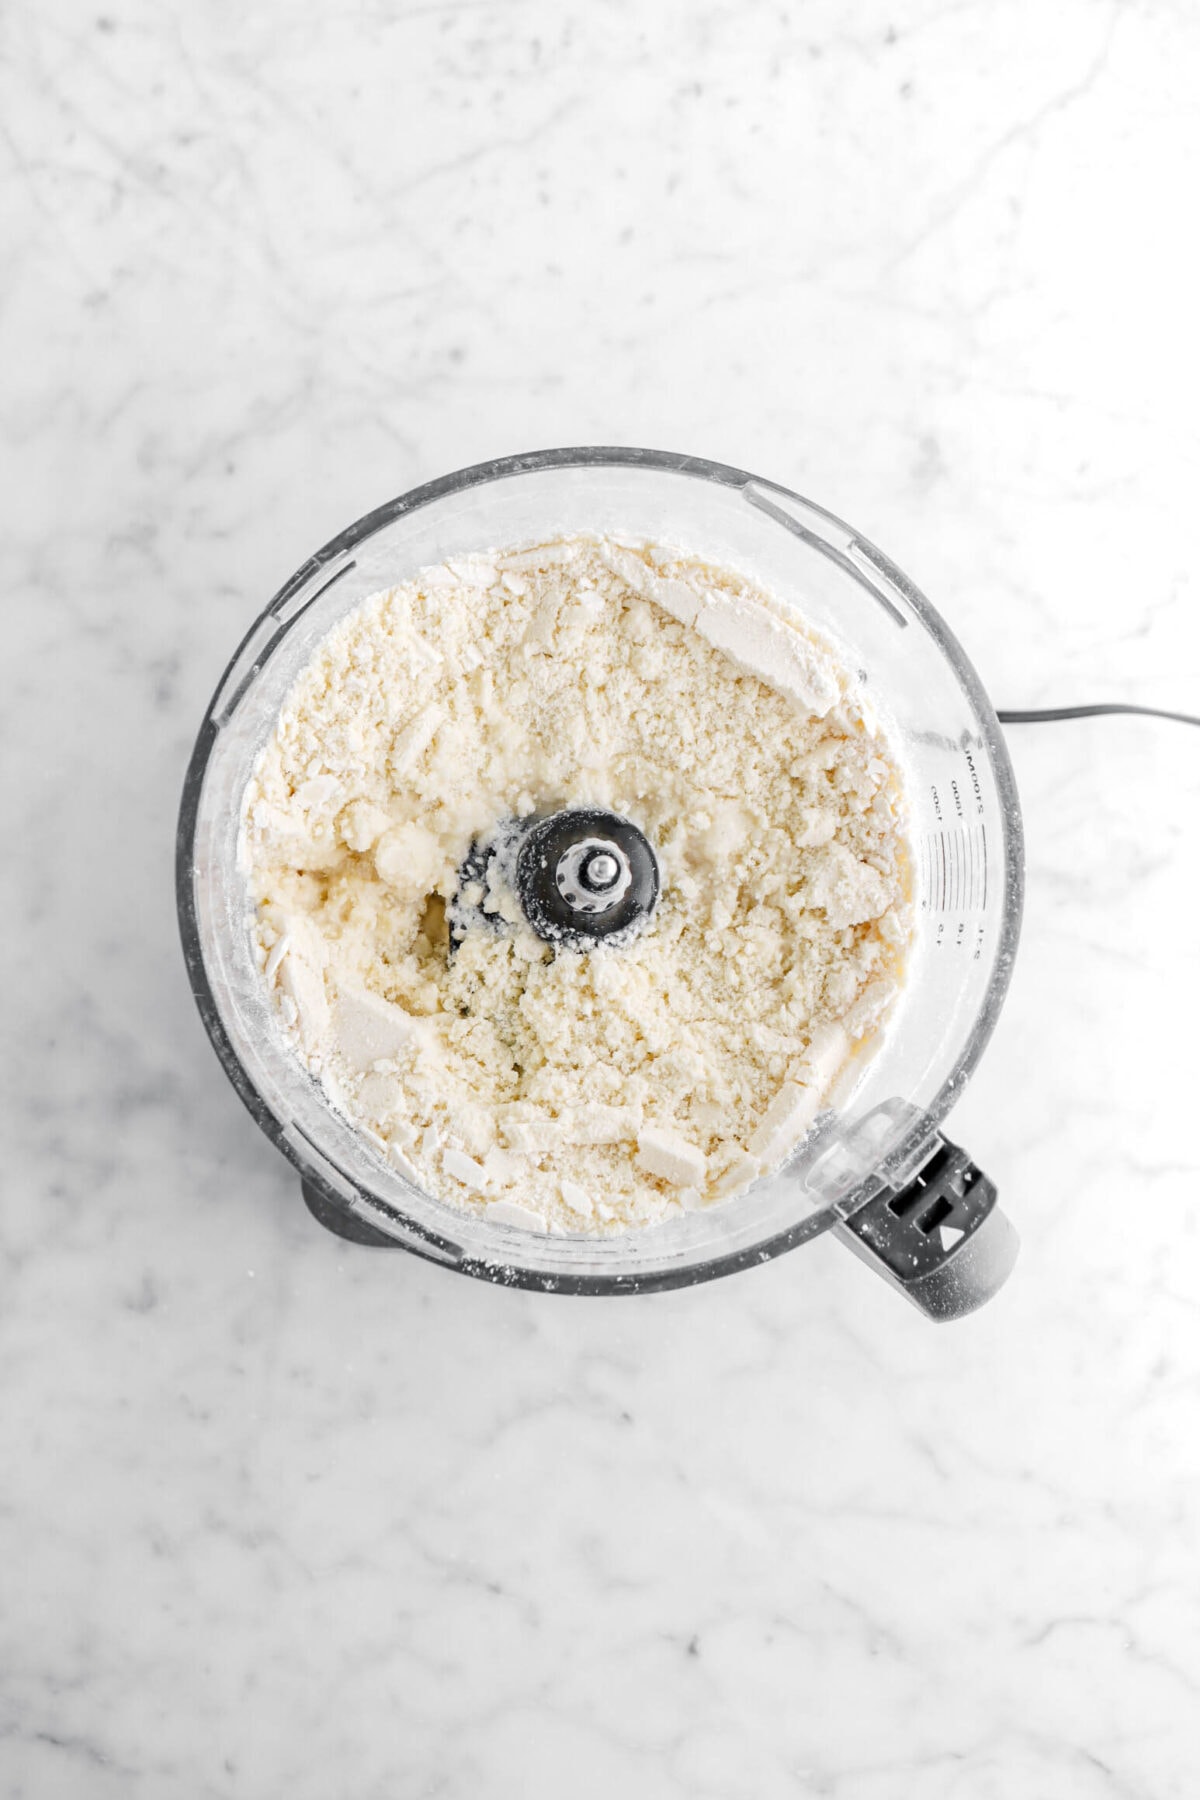
Step 1: Prepare pie dough
In the bowl of a food processor, combine flour and salt. Pulse a few times to combine.


Add butter, a little at a time, pulsing until combined.


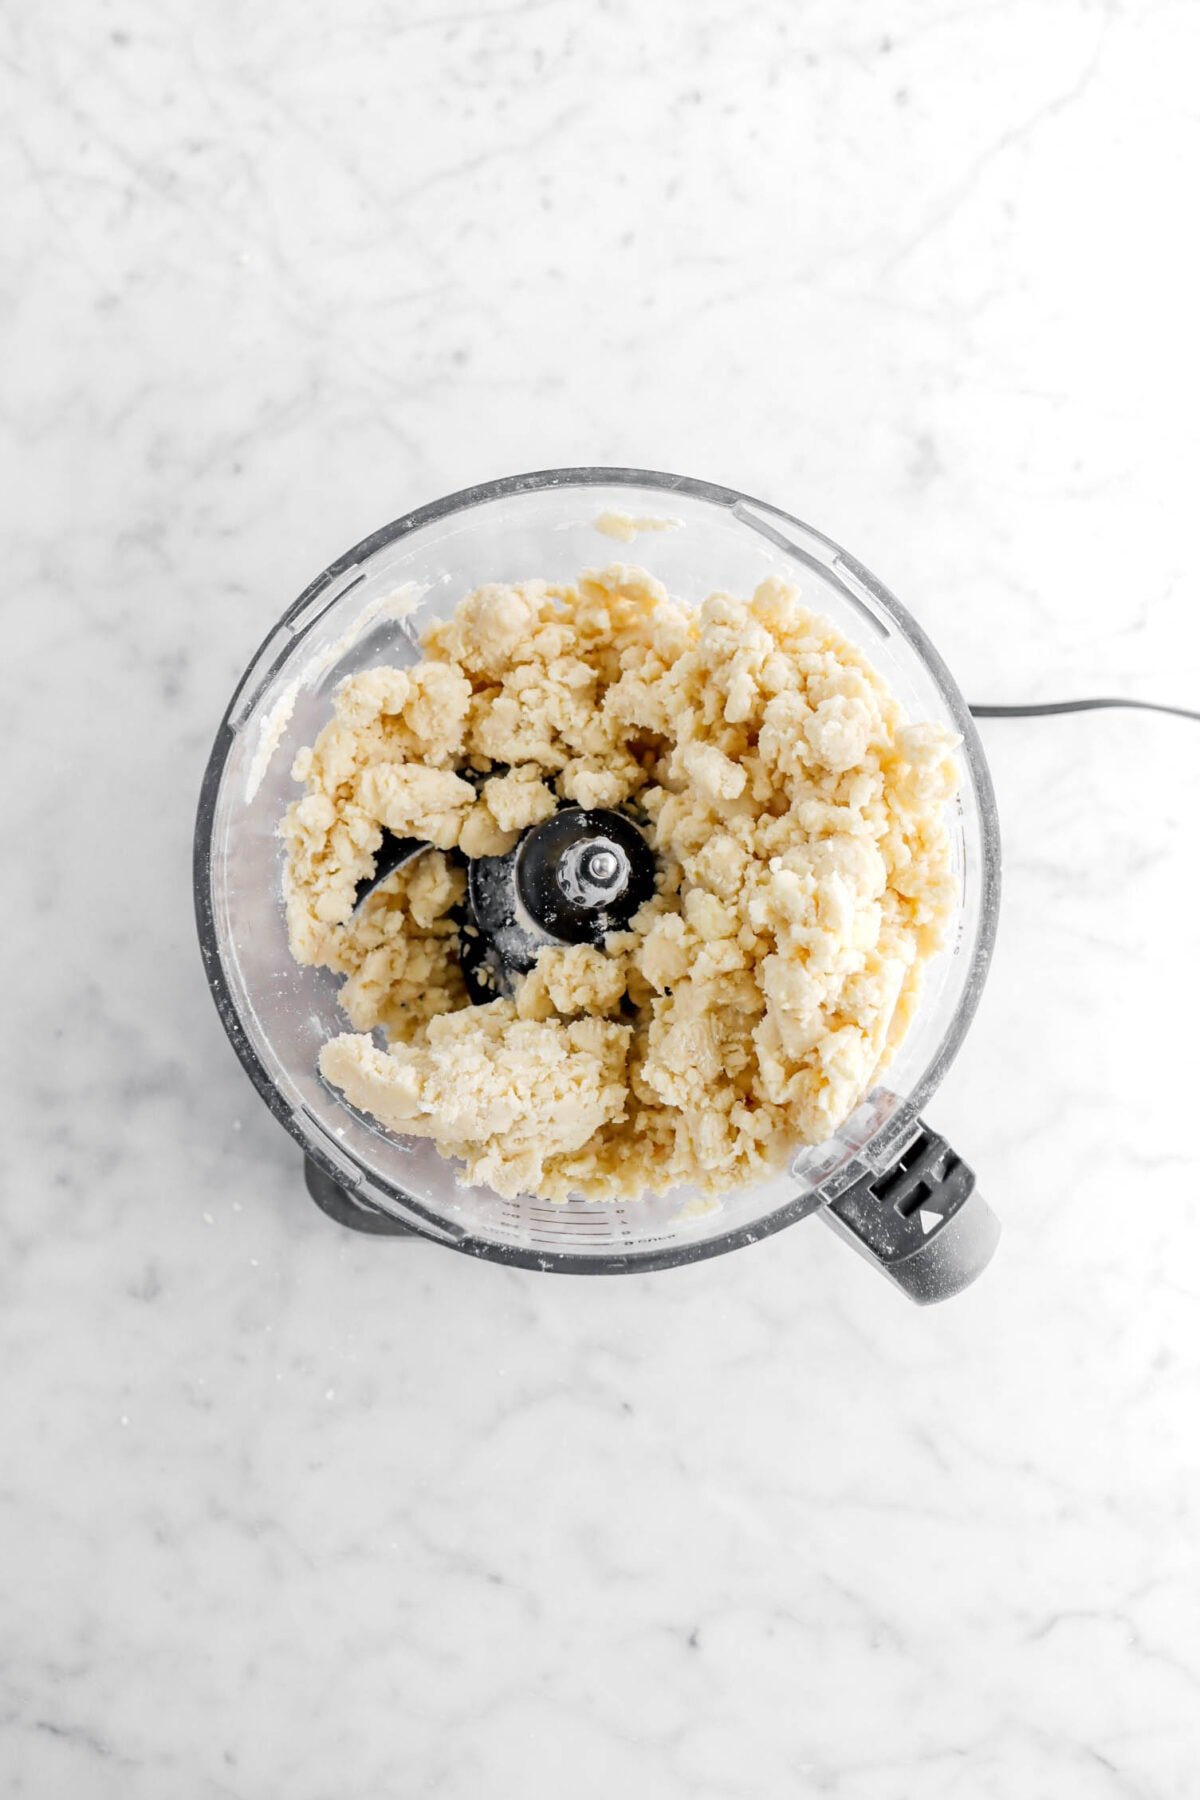
Drizzle in water until mixture forms a dough.
Step 2: Divide and roll out
Gently shape dough into 2 balls.

Working with one at a time, flatten slightly. Roll in a circle to ⅜ inch thick.


Fit into 9 inch x 2 inch pie pan. Remove parchment. Trim edges, if desired.


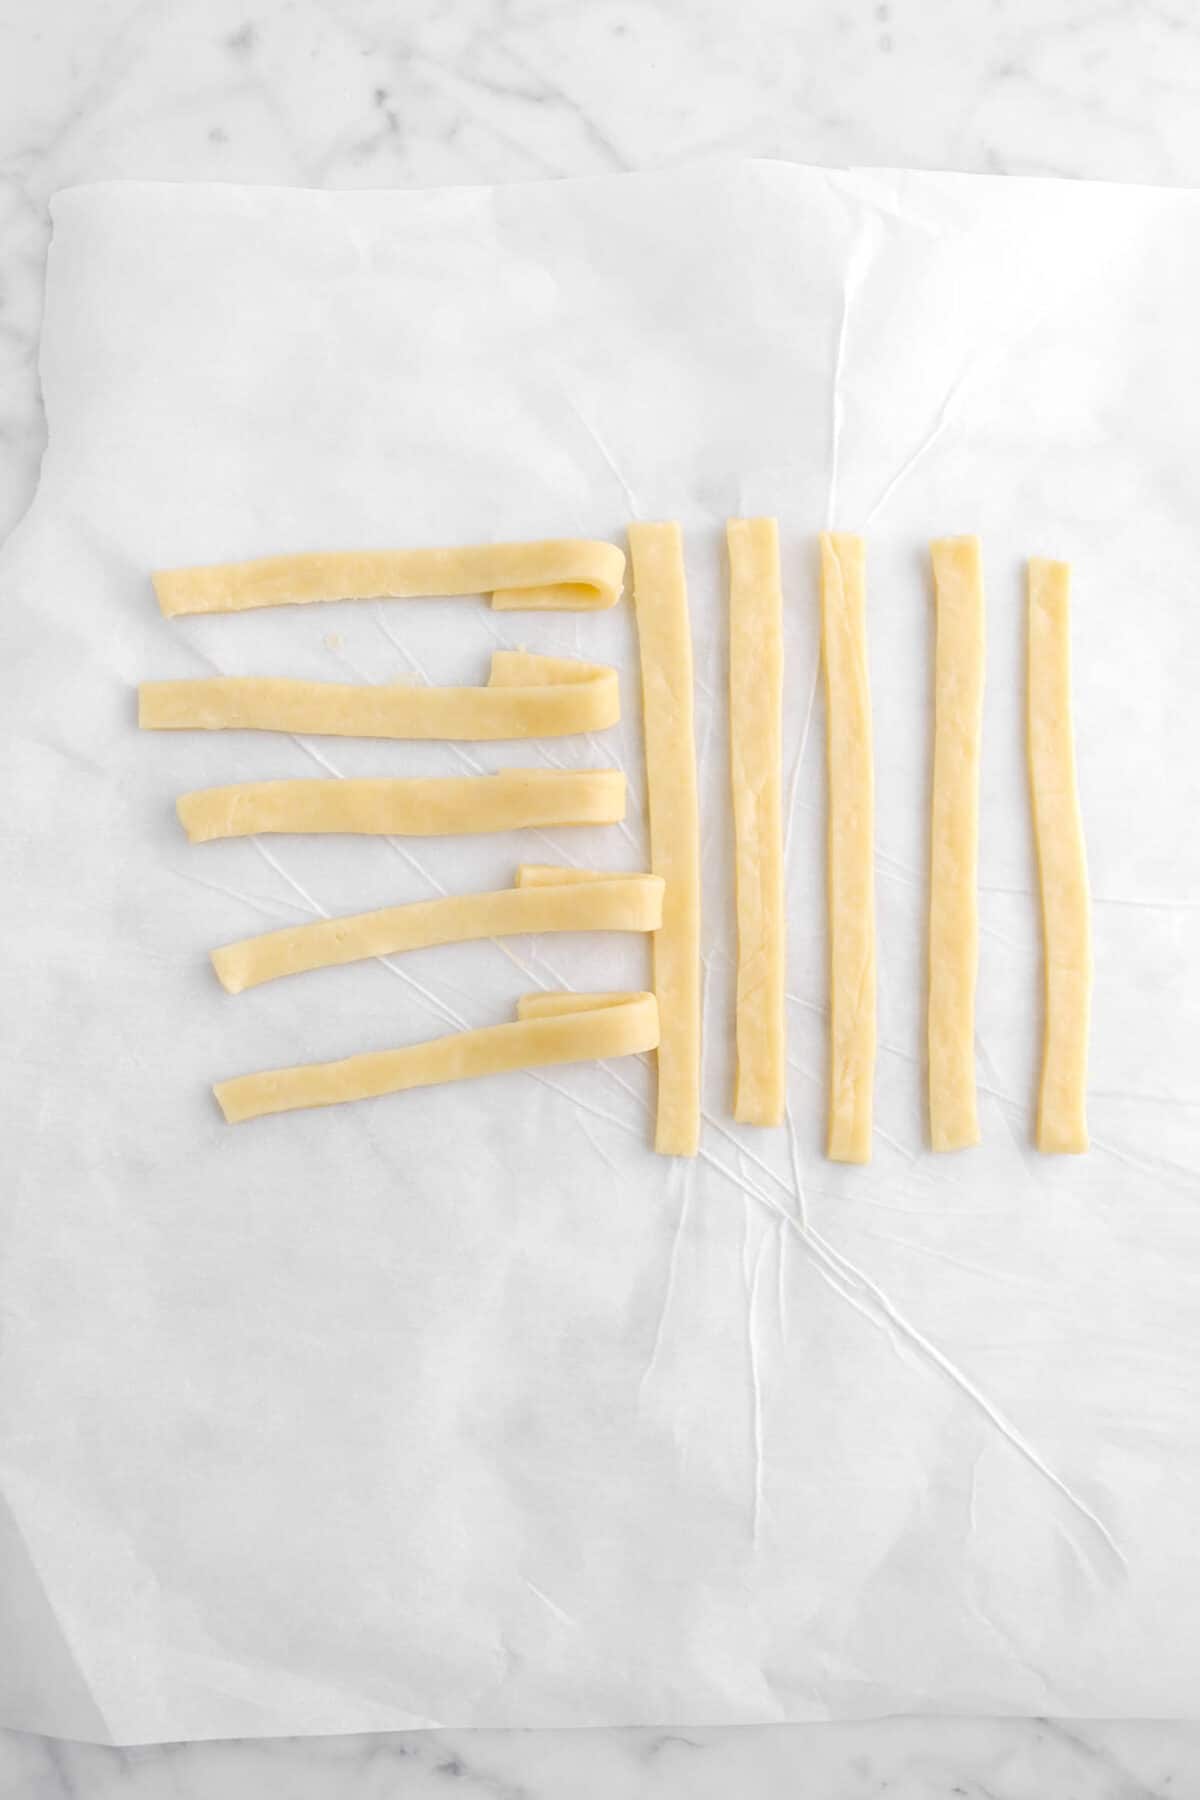
Roll out second ball of dough. Cut into strips to use for lattice. Refrigerate all crusts.

Step 2: Make filling
In a small bowl, combine cornstarch and 6½ Tablespoons water. Whisk, or stir, until smooth. Set aside.


Combine cherries, 6 Tablespoons sugar, and 1 cup water in a large saucepan. Bring to a boil, stirring often.


Stir in cornstarch mixture. Cook until thickened.


Stir in ⅔ cup sugar, salt, lemon juice, almond extract, and vanilla. Cook and stir over medium low heat until sugar is dissolved.


Strain out cherries.


Return liquid to heat. Cook until thickened.


Step 3: Fill pie, lattice, and bake
Pour cherries into pie crust. Pour thickened juice over cherries. Weave lattice across top. Pinch edges of dough together to seal.


Brush with egg wash, if desired. Bake for 75-80 minutes, until filling is bubbly and crust is golden brown.


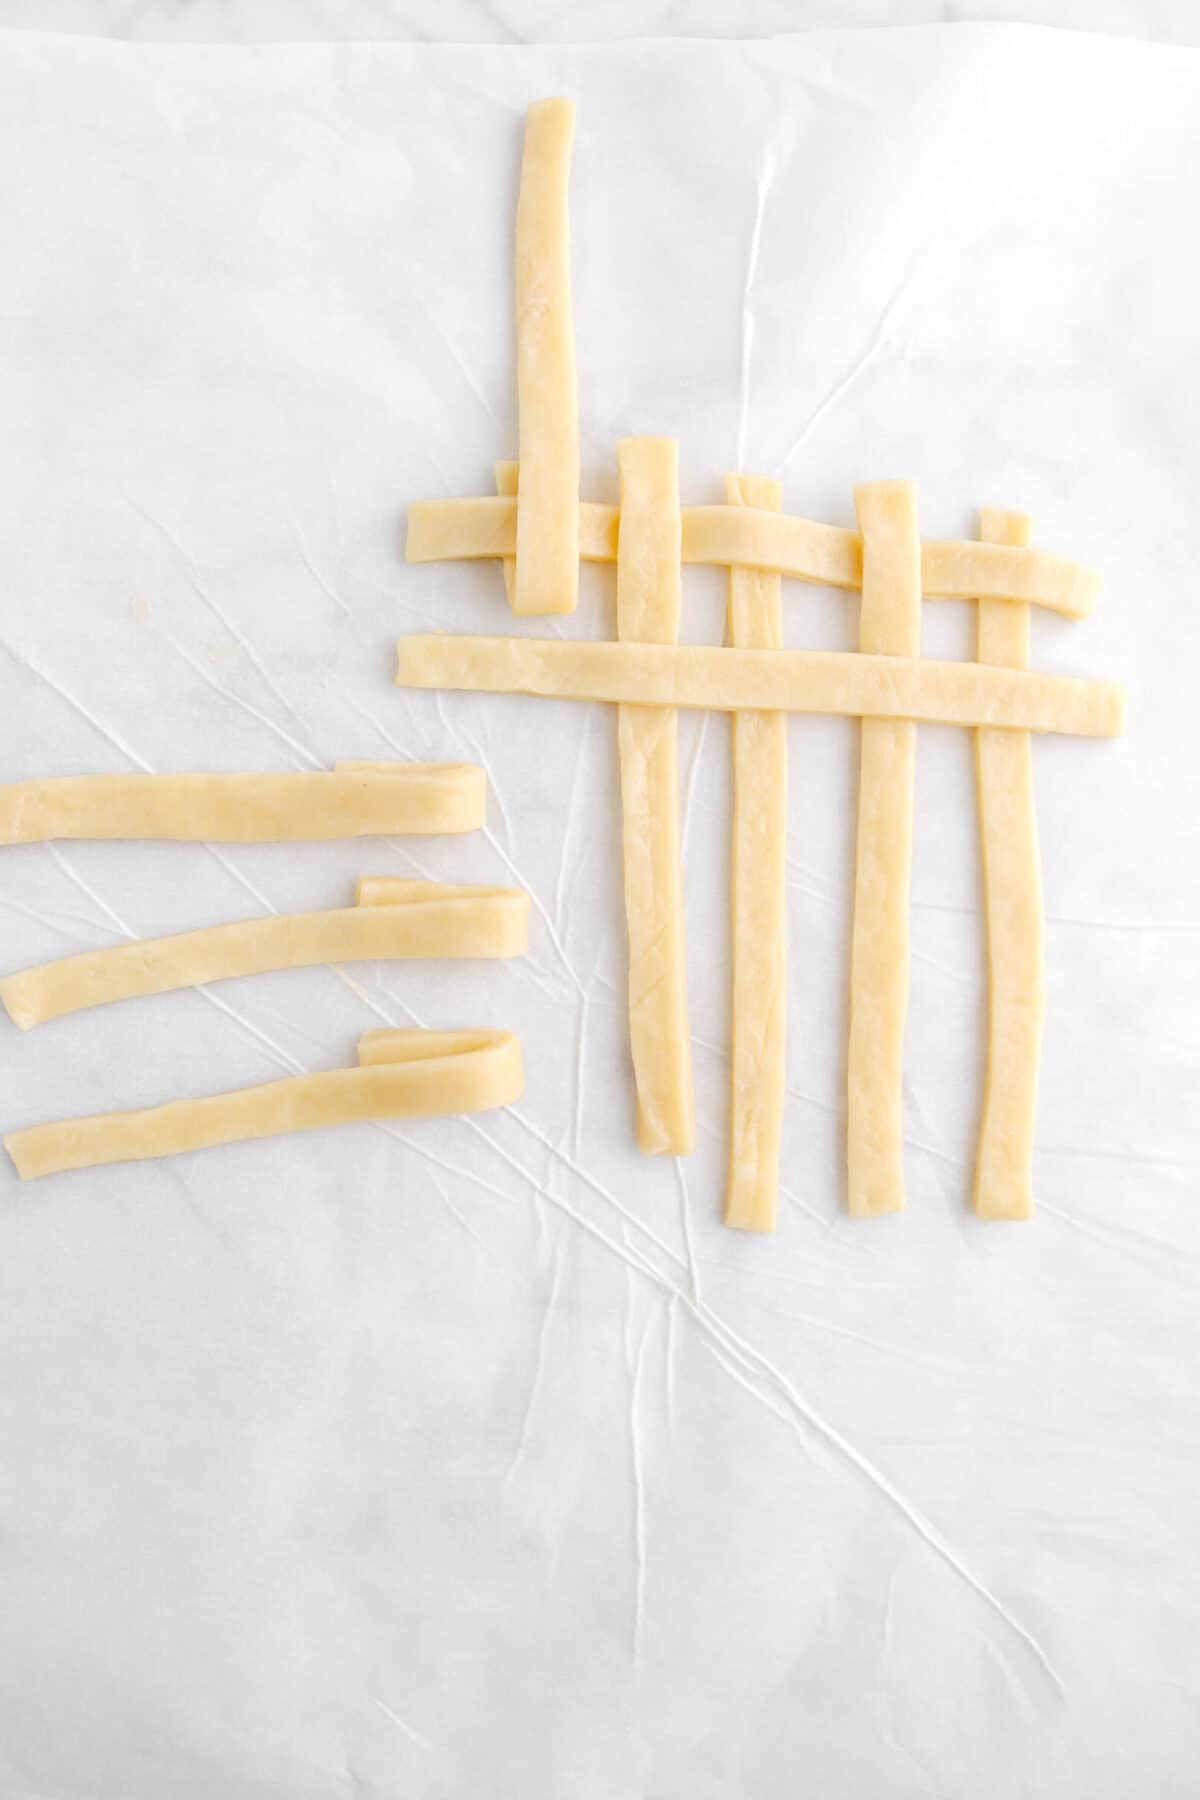
How To Lattice
Here’s where you need to take a deep breath and remember that there’s no need to worry! Latticing is actually pretty easy.
First, lay out 8 strands of pie dough on top of pie. 4 going vertically (up and down) and 4 going horizontally (side to side). When placing the horizontal strands, fold them over themselves so a small amount of the strand is under itself. This will make latticing an easier and cleaner task.
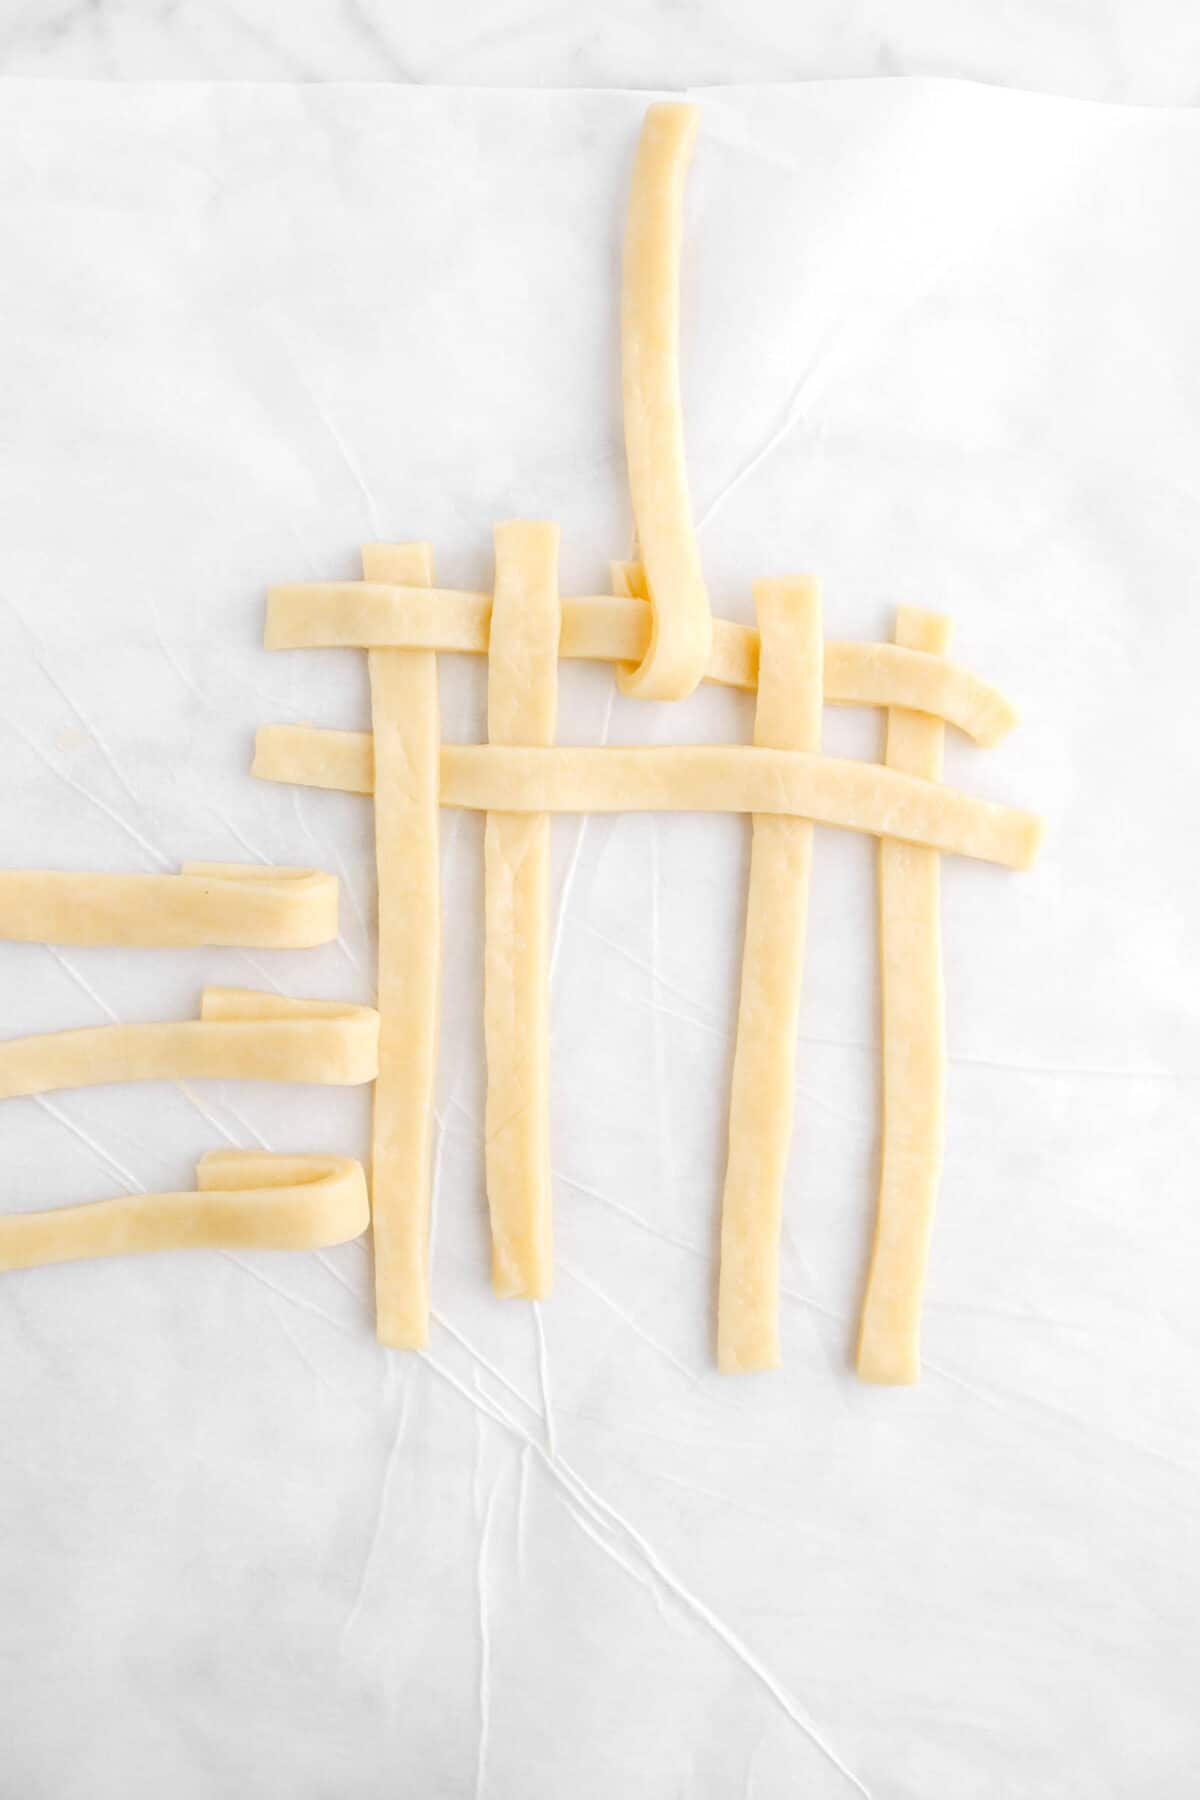
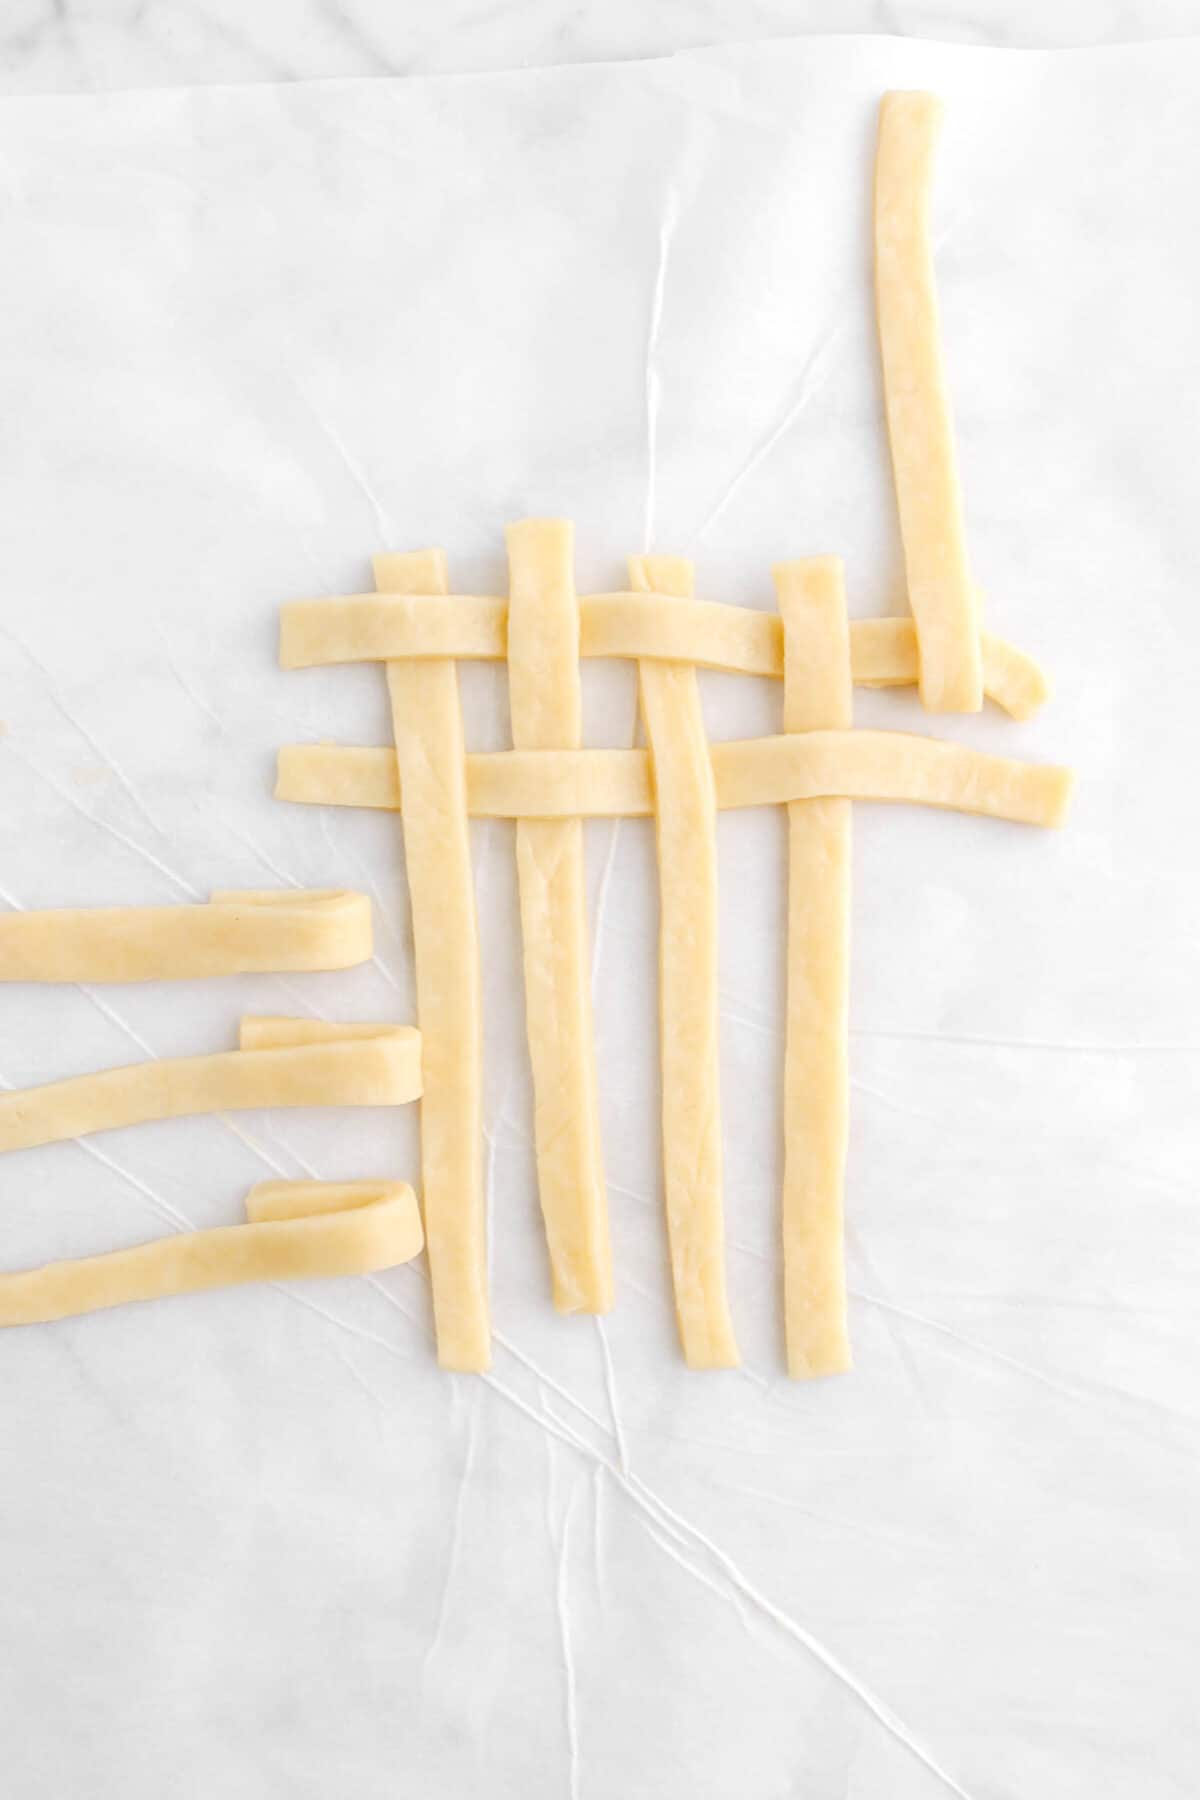
From here, it’s actually pretty simple. As you can see below, the top lattice is already complete. The images below are from a 5×5 lattice, but the principal is still the same.
So, the second horizontal strand will start under the first vertical strand. Now, still working with the second horizontal strand, we are going to lay it over the second vertical strand.
Pick up the third vertical strand and lay it out of the way. Lay the second horizontal strand across. Unfold the third vertical strand and lay it over the second horizontal strand. Lay the second horizontal strand across the fourth vertical strand. Pick up the fifth vertical strand and lay the second horizontal strand across. Place the fifth vertical strand over the second vertical strand and now you have the row of lattice complete!
Repeat these steps all the way down, alternating between starting with the horizontal strand over the first vertical and under the first vertical.


How to Crimp a Pie Crust
No need for any specialty equipment to crimp a pie crust! All you need is your hands and a little bit of patience.
- Fold excess dough over the edge of the pie.
- Slowly, crimp the dough by pushing the dough out with your knuckle and at the same time pushing/pinching the dough around it with the thumb and forefinger of your other hand.
- Repeat all the way around the pies edge to create a beautifully scalloped pie crust!

FAQ’s and Troubleshooting
What are the best cherries to use for cherry pie?
For this recipe, we used sweet red cherries as they provided the most amount of flavor when we were test baking!
How do I pit cherries without a cherry pitter?
If you don’t have a cherry pitter, no worries! You can use a metal straw or a chopstick to push the seed out of the cherry. Be sure to discard the seeds!
Should I use store-bought filling or homemade?
For this recipe, we highly recommend using the filling stated in the recipe card. It will be so much better and fresher than anything you could buy!
Do I need to par-bake the crust?
For this type of pie, you do not need to par-bake or blind bake this crust! It will have plenty of time to bake.
Why is my pie crust tough?
If your pie crust came out tough, it was overworked. It can happen in the food processor or if it’s been handled too much/re-rolled too much.
Can I make this filling juicer?
If you’d like a juicier pie, you can skip the cooking of the filling! Instead, just mix the cherries, corn starch, sugar, lemon juice, almond extract, and vanilla extract in a large bowl. From there, dump into the prepared crust, lattice, and bake! This will result in a much juicer, more traditional cherry pie.
How can I tell when my cherry pie is done?
The pie will be ready when the top of the pastry is golden brown. You should also see the filling bubbling up through the lattice!

3 Tips For The Perfect Pie Crust
- Remember, the fridge is a pie dough’s best friend! You really need to keep it cold to ensure the best experience.
- Preheat the oven! I know this sounds simple, but when you put the cold dough into the hot oven, it creates steam. Therefore, flakier crust!
- Keep the butter chunks bigger and, when you’re rolling, if you see any chunks of butter on the edge, cut it off and place it back in the middle.
What To Serve with Cherry Pie
Looking for something a little sweeter to go with your slice of pie? Here are a few of our favorite things to scoop or drizzle over the top of each slice!
- Vanilla Ice Cream
- Chantilly Cream
- Chocolate Sauce
- Powdered Sugar
Decorating Ideas
With this cherry pie, there are so many different things you can do to decorate it/make the top of the pie more festive!
- Use a cookie cutter to cut out shapes of flowers and cherries to add a cute and decorative element to the pie!
- You can cut some of the pie dough into thinner strips and braid them together.
- Feeling patriotic? Use an American Flag Pie Crust Cutter to create an intricate and patriotic pie!
- If it’s near the holidays, use themed cookie cutters to cut out shapes to decorate this pie! i.e. Fall leaves or even snowflakes!
- You can color the pie dough for the top, if desired. However, be careful as this may over-work the dough!

Looking for more recipes like this? Here are a few you may like:
When you make this Homemade Cherry Pie, leave a comment down below! We love hearing from you and answering any questions you might have! Also, be sure to tag us on social media and hashtag it #BakersTable.

The Best Homemade Cherry Pie (Thicker Filling!)
Ingredients
Crust
- 3 cups all purpose flour
- 1 teaspoon salt
- 1⅛ cups unsalted butter, cold, sliced
- 6-8 Tablespoons cold water
- Heavy cream or egg wash, for brushing crust
Filling
- ⅓ cup cornstarch
- 6½ Tablespoons water
- 8 cups fresh cherries, pitted
- 6 Tablespoons granulated sugar
- 1 cup water
- ⅔ cup granulated sugar
- ⅔ teaspoon salt
- 2½ teaspoons lemon juice
- ⅓ teaspoon almond extract
- 1½ teaspoons vanilla extract
Instructions
Crust
- In the bowl of a food processor fitted with the dough blade, combine flour and salt.
- Pulse a few times to combine.
- Add butter, a little at a time, pulsing until combined.
- Drizzle in water until mixture forms a dough.
- Turn out onto a piece of parchment paper.
- Gently shape dough into 2 balls.
- Working with one at a time, flatten slightly.
- Cover with a second piece of parchment paper.
- Roll in a circle to ⅜ inch thick.
- Fit into 9-inch x 2-inch pie pan.
- Remove parchment.
- Trim edges, if desired.
- Refrigerate.
- Roll out second ball of dough into a circle that is ⅜ inch thick.
- Cut into strips to use for lattice.
- Place on parchment covered sheet pan.
- Refrigerate.
Filling
- Heat oven to 375℉/190℃.
- In a small bowl, combine cornstarch and 6½ Tablespoons water.
- Whisk, or stir, until smooth. Set aside.
- Combine cherries, 6 Tablespoons sugar, and 1 cup water in a large saucepan.
- Bring to a boil, stirring often.
- Stir in cornstarch mixture.
- Cook until thickened.
- Stir in ⅔ cup sugar, salt, lemon juice, almond extract, and vanilla.
- Cook and stir over medium low heat until sugar is dissolved.
- Strain out cherries. Set aside.
- Return juice to saucepan.
- Cook until thickened.
- Pour over cherries.
- Weave lattice across top.
- Pinch edges of dough together to seal.
- Brush with egg wash or heavy cream, if desired.
- Bake for 75-80 minutes, until filling is bubbly and crust is golden brown.
- Allow to cool completely and then refrigerate at least 1-2 hours (preferably overnight) before cutting.
Notes + Tips!
- Frozen cherries can be used instead of fresh. Just be sure to thaw them before cooking!
- A store-bought pie crust may be used, but we cannot guarantee baking times.
- Sour cherries can be used instead of sweet red cherries.
- If you don’t have any unsalted butter for the crust, you may use salted. Make sure to reduce the salt in the recipe to 3/4 teaspoon.
- We used a deep dish ceramic pie pan. A glass pyrex or traditional pie pan may or may not be deep enough to hold this pie.
- The fridge is your best friend! With the high butter content, the dough can become soft quickly…especially on hot days!
- You may need more or less water than stated in the recipe card for the pie crust. Always add a little at a time!
- Be careful not to overwork the dough. (It’s easy to do when using a food processor!)
- Use fresh cherries for the filling for the best flavor and texture.
- Don’t skip cooking the juice from the cherries! This is what gives the pie the perfect balance between juicy and thick filling.
- Sealing the lattice is important! Use your fingers to press it down. You may also need to cut off excess dough. Trim as needed.
- Be sure to lightly brush each pie with heavy cream or an egg wash! It helps the crust brown evenly.
- Once the pie has cooled, be sure to refrigerate this pie for AT LEAST an hour (or overnight) before serving to allow this pie to set up properly.
Tools You May Need (affiliate links)
– Still Hungry? –
Here are a few recipes may like!


